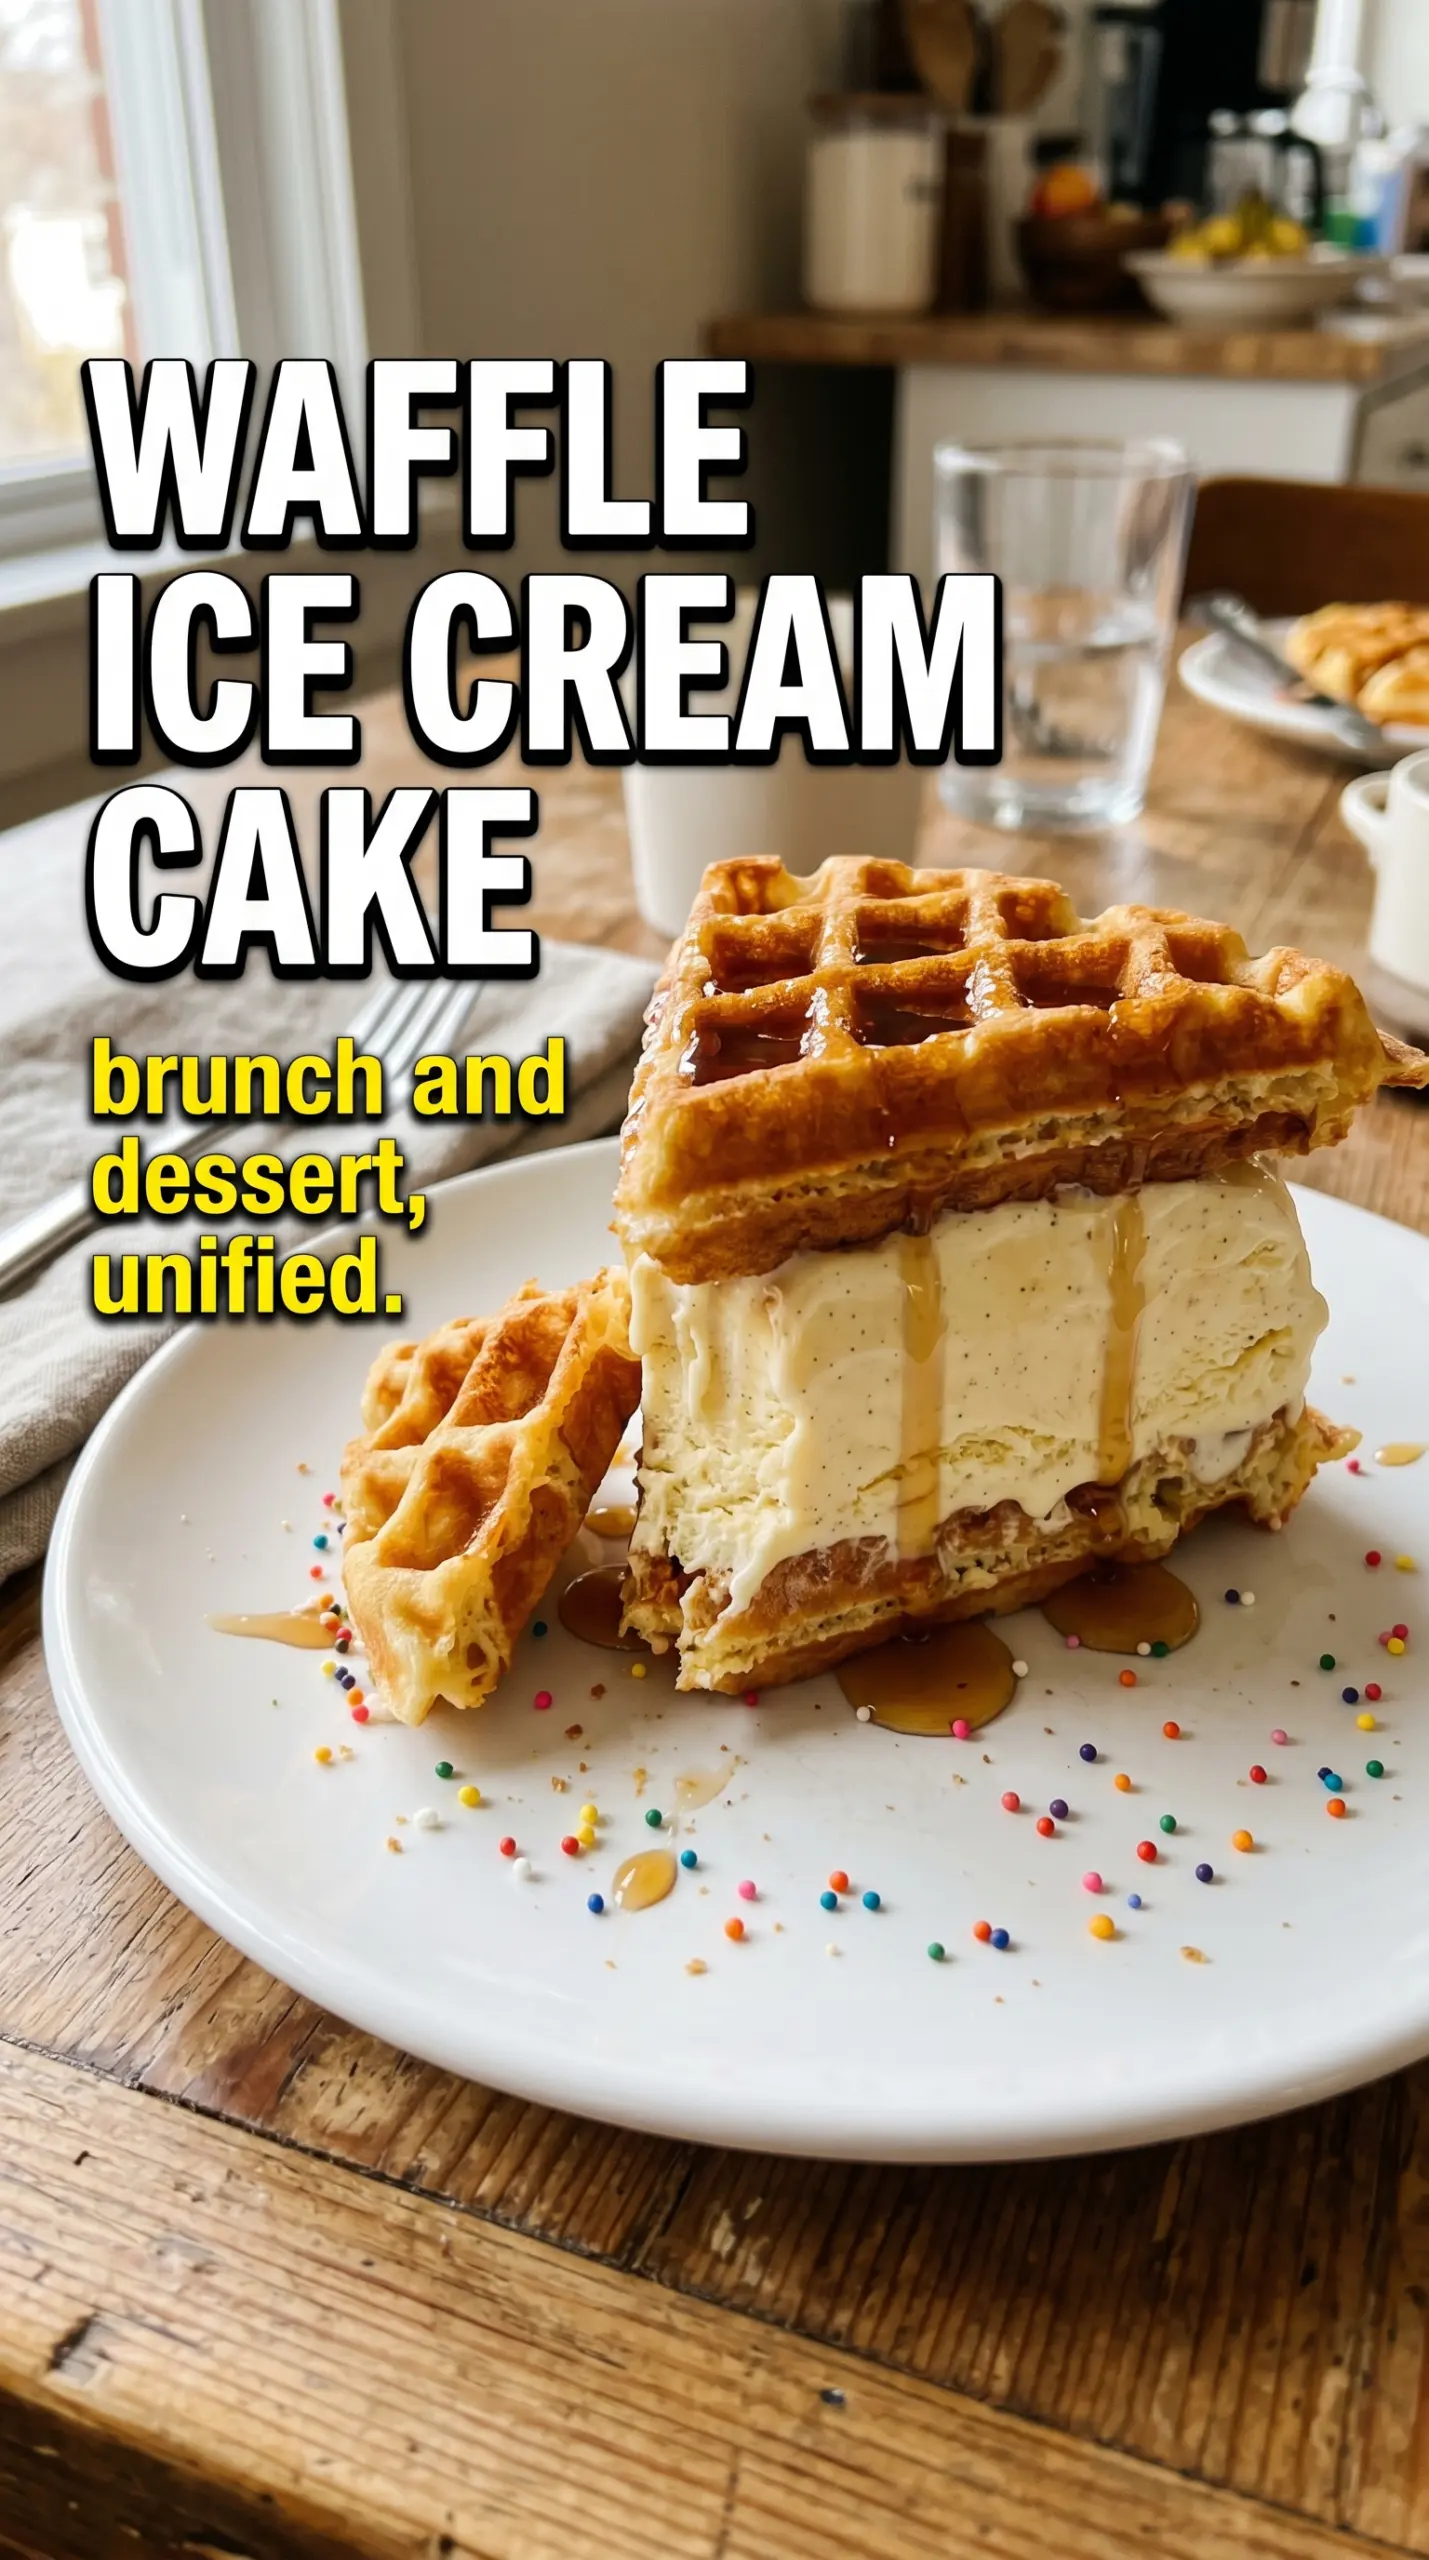
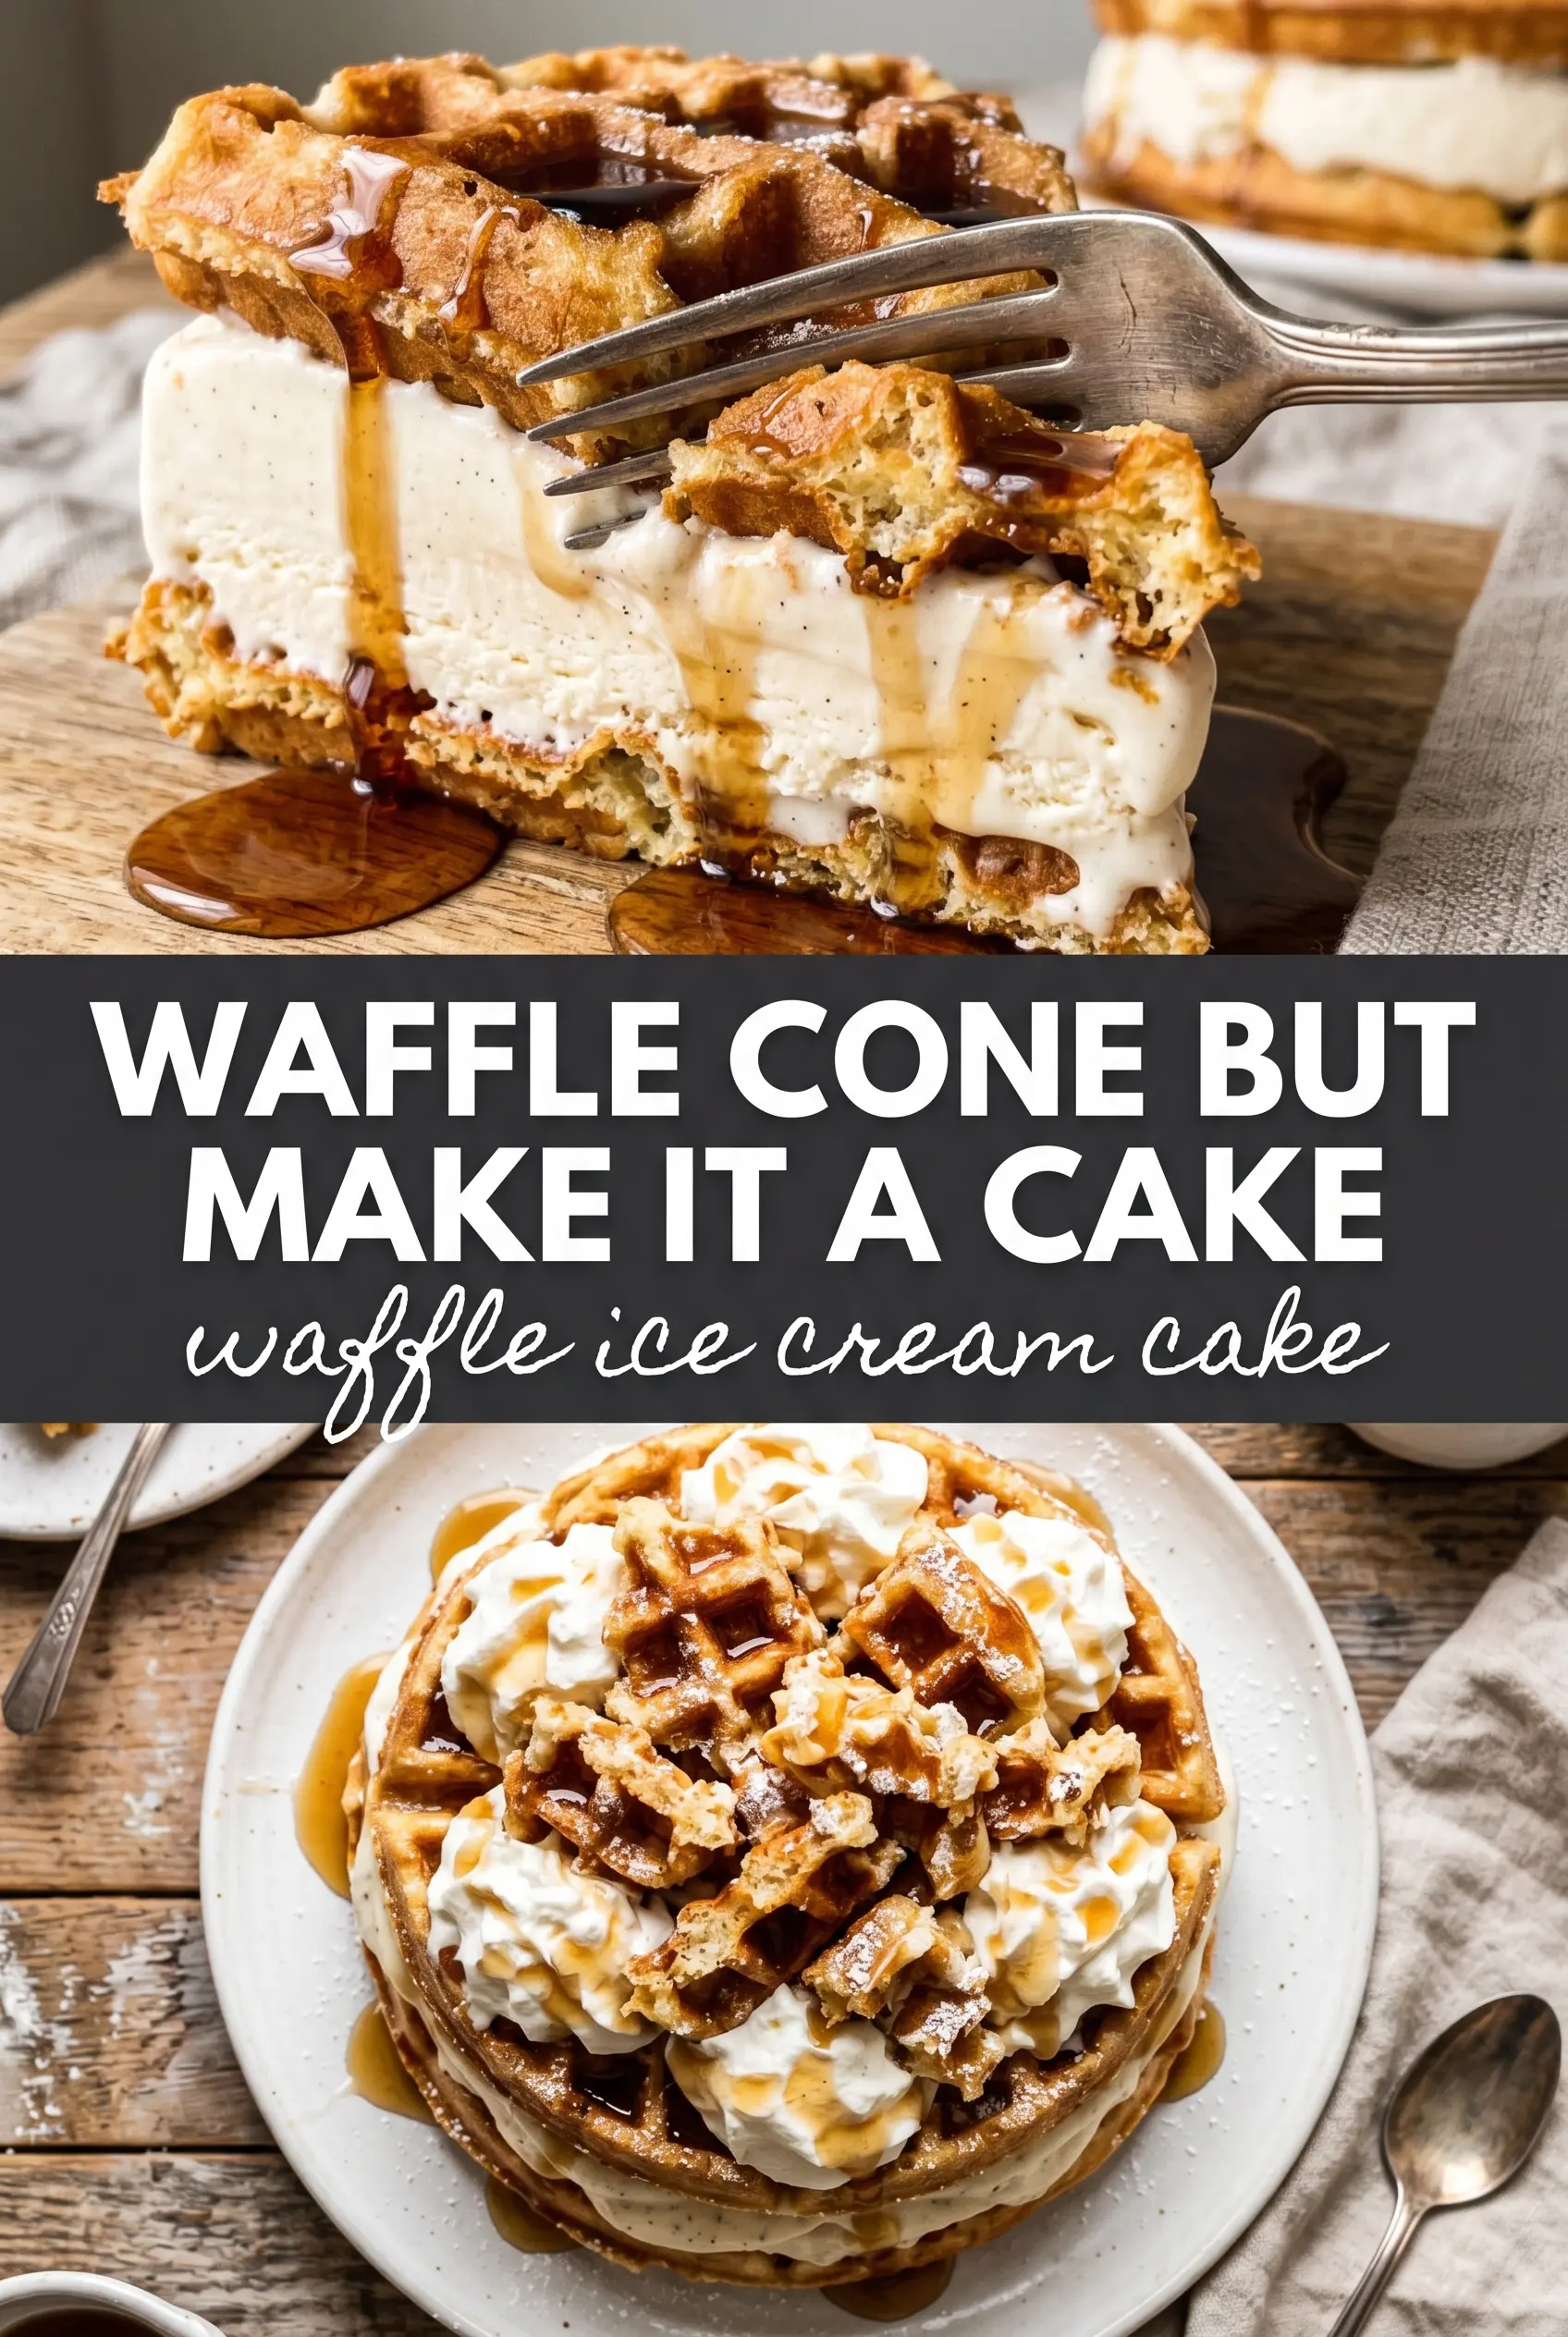
Golden waffles, softened vanilla ice cream, and a ribbon of maple caramel turn this waffle ice cream cake into the kind of dessert people lean over the table for before anyone has even sliced it. The layers stay distinct, which is what makes the first cut satisfying: crisp-edged waffle, cold creaminess, then that sweet maple note tying everything together. It eats like a celebration and looks like you spent far more time on it than you actually did.
The trick is starting with waffles that are fully cooled, because even a little warmth will melt channels into the ice cream and collapse the layers. A springform pan helps the cake set in a neat stack, and brushing each waffle with maple syrup gives the finished slices a deeper breakfast-for-dessert flavor without making them soggy. The ice cream should be softened enough to spread, not melted into soup; that middle ground gives you clean layers and a firm freeze.
Below you’ll find the exact layering order, the one freezer timing detail that keeps the cake from sliding apart, and a few ways to change the topping without losing the look of the cross-section.
The waffles stayed crisp around the edges after freezing, and the maple syrup between the layers made it taste like a diner breakfast and birthday cake had a very good idea together. Mine sliced cleanly after the full freeze time.
Like this waffle ice cream cake? Save it for the next birthday when you want a crisp waffle stack, creamy layers, and maple caramel in every slice.
The Part That Keeps the Waffles From Turning Soggy
The biggest mistake in a waffle ice cream cake is treating the waffles like a neutral cake layer. They aren’t neutral. Waffles already have butter, browning, and structure, which means they can hold up beautifully in the freezer if you respect their texture. Cooled waffles are non-negotiable here. Warm waffles melt the ice cream on contact, and once that happens, the layers settle unevenly and the cake slices slump instead of standing tall.
Brushing the waffles with maple syrup does two jobs at once. It adds flavor, and it gives each layer a little moisture so the frozen cake doesn’t eat dry. Don’t overdo it. A light brush is enough. Too much syrup will seep into the waffles and soften the edges you want to keep crisp.
- Waffles — Store-bought waffles work fine if they’re sturdy and fully cooled, but homemade buttermilk waffles bring a deeper flavor and better browning. Pick waffles with defined pockets and a firm exterior. Soft, pale waffles tend to collapse under the ice cream.
- Vanilla ice cream — Use a good vanilla with enough fat to freeze into clean layers. Budget ice cream can work, but icy brands tend to crack when sliced. Soften it just until spreadable; if it gets loose, it will slide between the waffles instead of staying put.
- Maple syrup — This is not just garnish. It ties the waffle flavor to the ice cream and keeps the cake from tasting flat. Real maple syrup is worth using here because imitation syrup can taste thin after freezing.
- Caramel sauce — Use a pourable sauce for topping, not a stiff candy caramel. It should drape over the whipped cream and down the sides without hardening into shards. Warm it only slightly if it’s too thick to drizzle.
What Each Ingredient Is Actually Doing in This Ice Cream Cake
- Crust or base layer (cookies, brownies, or cake) — This provides structure and texture contrast. A sturdy base keeps the whole cake from crumbling when served.
- Ice cream (the main event) — Choose quality ice cream or frozen yogurt. Soft-serve or premium ice cream works better than hard-packed store brands.
- Cake layer (optional but recommended) — A thin cake layer adds substance and keeps the cake from being all frozen texture. Make it thin so it doesn’t overpower the ice cream.
- Sauce or syrup layer (fudge, caramel, or fruit) — This adds flavor depth and prevents the cake from tasting one-dimensional. Freeze between layers so sauces stay distinct.
- Toppings (chocolate chips, cookies, candy, or nuts) — These add texture and visual appeal. Mix-ins stay crispy longer if frozen separately first.
- Frosting or whipped cream (optional topping) — This adds richness to the outside. Keep it simple or it overwhelms the cake.
- Freezing time (the patience that pays off) — Each layer needs time to set so they stay distinct when sliced. Rushing this step means layers muddy together.
- Storage and serving technique (thaw 5 minutes before slicing) — A brief thaw makes slicing clean and easy. Serve slices immediately for best texture.
Building the Stack So It Freezes Cleanly
Start With a Tight Base
Set the first waffle in a springform pan and brush it lightly with maple syrup before adding the ice cream. That first layer matters more than people think, because it sets the shape for the whole cake. Press the waffle flat so there aren’t any air pockets under it. If the base is uneven, the stack tilts as it freezes.
Spread the Ice Cream, Don’t Stir It
Scoop softened vanilla ice cream over the waffle and spread it into an even layer with an offset spatula. Work fast and keep the pressure light. If you mash at it, you’ll push the waffle out of alignment and trap gaps in the layer. You want a thick, even blanket of ice cream that reaches the edges without spilling over the pan.
Repeat Without Letting the Pan Warm Up
Continue with the remaining waffles and ice cream, brushing each waffle with maple syrup before the next layer goes on. If the ice cream starts to get loose, pause and return the pan to the freezer for 10 to 15 minutes before finishing. The cake freezes best when each layer keeps its shape on contact. End with a waffle on top so the final slice has a defined cap instead of a soft ice cream lid.
Freeze Long Enough to Slice
Six hours is the minimum for a cake this size, and overnight is even better if you’ve got the time. The center needs to freeze all the way through, not just on the outside, or the layers will shift when you release the ring. After piping the whipped cream and drizzling the caramel, give it one more hour in the freezer so the topping firms up before serving.
Ways to Change the Cake Without Losing the Cross-Section
Make It Gluten-Free With Crisp Waffles
Use gluten-free waffles that bake up firm, not tender and cakey. The structure matters more than the brand name here, because flimsy waffles won’t hold the frozen layers as cleanly. Let them cool completely before stacking, since gluten-free waffles often feel set before they’re fully dry.
Swap the Vanilla for a Bolder Ice Cream
Butter pecan, maple, or even cinnamon ice cream gives the cake a warmer, more dessert-like edge. Keep the rest of the build the same so the waffle layers still read clearly when sliced. Avoid mix-ins that are too chunky or the slices will look messy and fall apart at the knife.
Make It Lighter With Stabilized Whipped Cream
If you want a less rich finish, use stabilized whipped cream on top so it holds its shape after a short time out of the freezer. Plain whipped cream works, but it softens faster and can slide on warm plates. This swap doesn’t change the flavor much, but it gives you a neater finish for a party table.
Use Honey Instead of Maple for a Different Sweet Note
Honey works if that’s what you have, but it tastes brighter and less caramel-like than maple syrup. Brush it on lightly so it doesn’t dominate the waffle flavor or make the layers sticky. The cake will still slice cleanly, but the final taste leans more toward honeyed breakfast dessert than maple diner cake.
Storage and Serving Timing
- Freezer: This cake holds well for up to 2 days once assembled. After that, the waffles start to soften and the texture turns less distinct.
- Serving: Run a sharp knife under hot water, wipe it dry, then slice while the cake is still very cold. If the knife drags, the ice cream is starting to warm and the layers will smear.
- Leftover slices: Wrap individual slices tightly and freeze them flat. That keeps the waffle layers from drying out and makes it easy to grab one piece at a time.
Questions I Get Asked About This Recipe
Waffle Ice Cream Cake
Ingredients
Equipment
Method
- Place a waffle on the bottom of a springform pan, then brush it with maple syrup for a glossy base layer.
- Spread a thick, even layer of softened vanilla ice cream over the waffle so it reaches the edges.
- Add another waffle layer, brush with maple syrup, and press lightly to help it adhere to the ice cream.
- Continue layering waffles and softened vanilla ice cream, brushing each waffle with maple syrup, until the pan is full and you end with a waffle layer on top.
- Freeze the layered cake for 6 hours, or until completely firm enough to slice.
- Pipe or spread whipped cream over the top of the frozen cake in an even layer.
- Drizzle caramel sauce over the whipped cream so it pools slightly in spots.
- Top with fresh berries and finish with a maple drizzle.
- Freeze for 1 more hour before releasing from the springform pan and serving.


