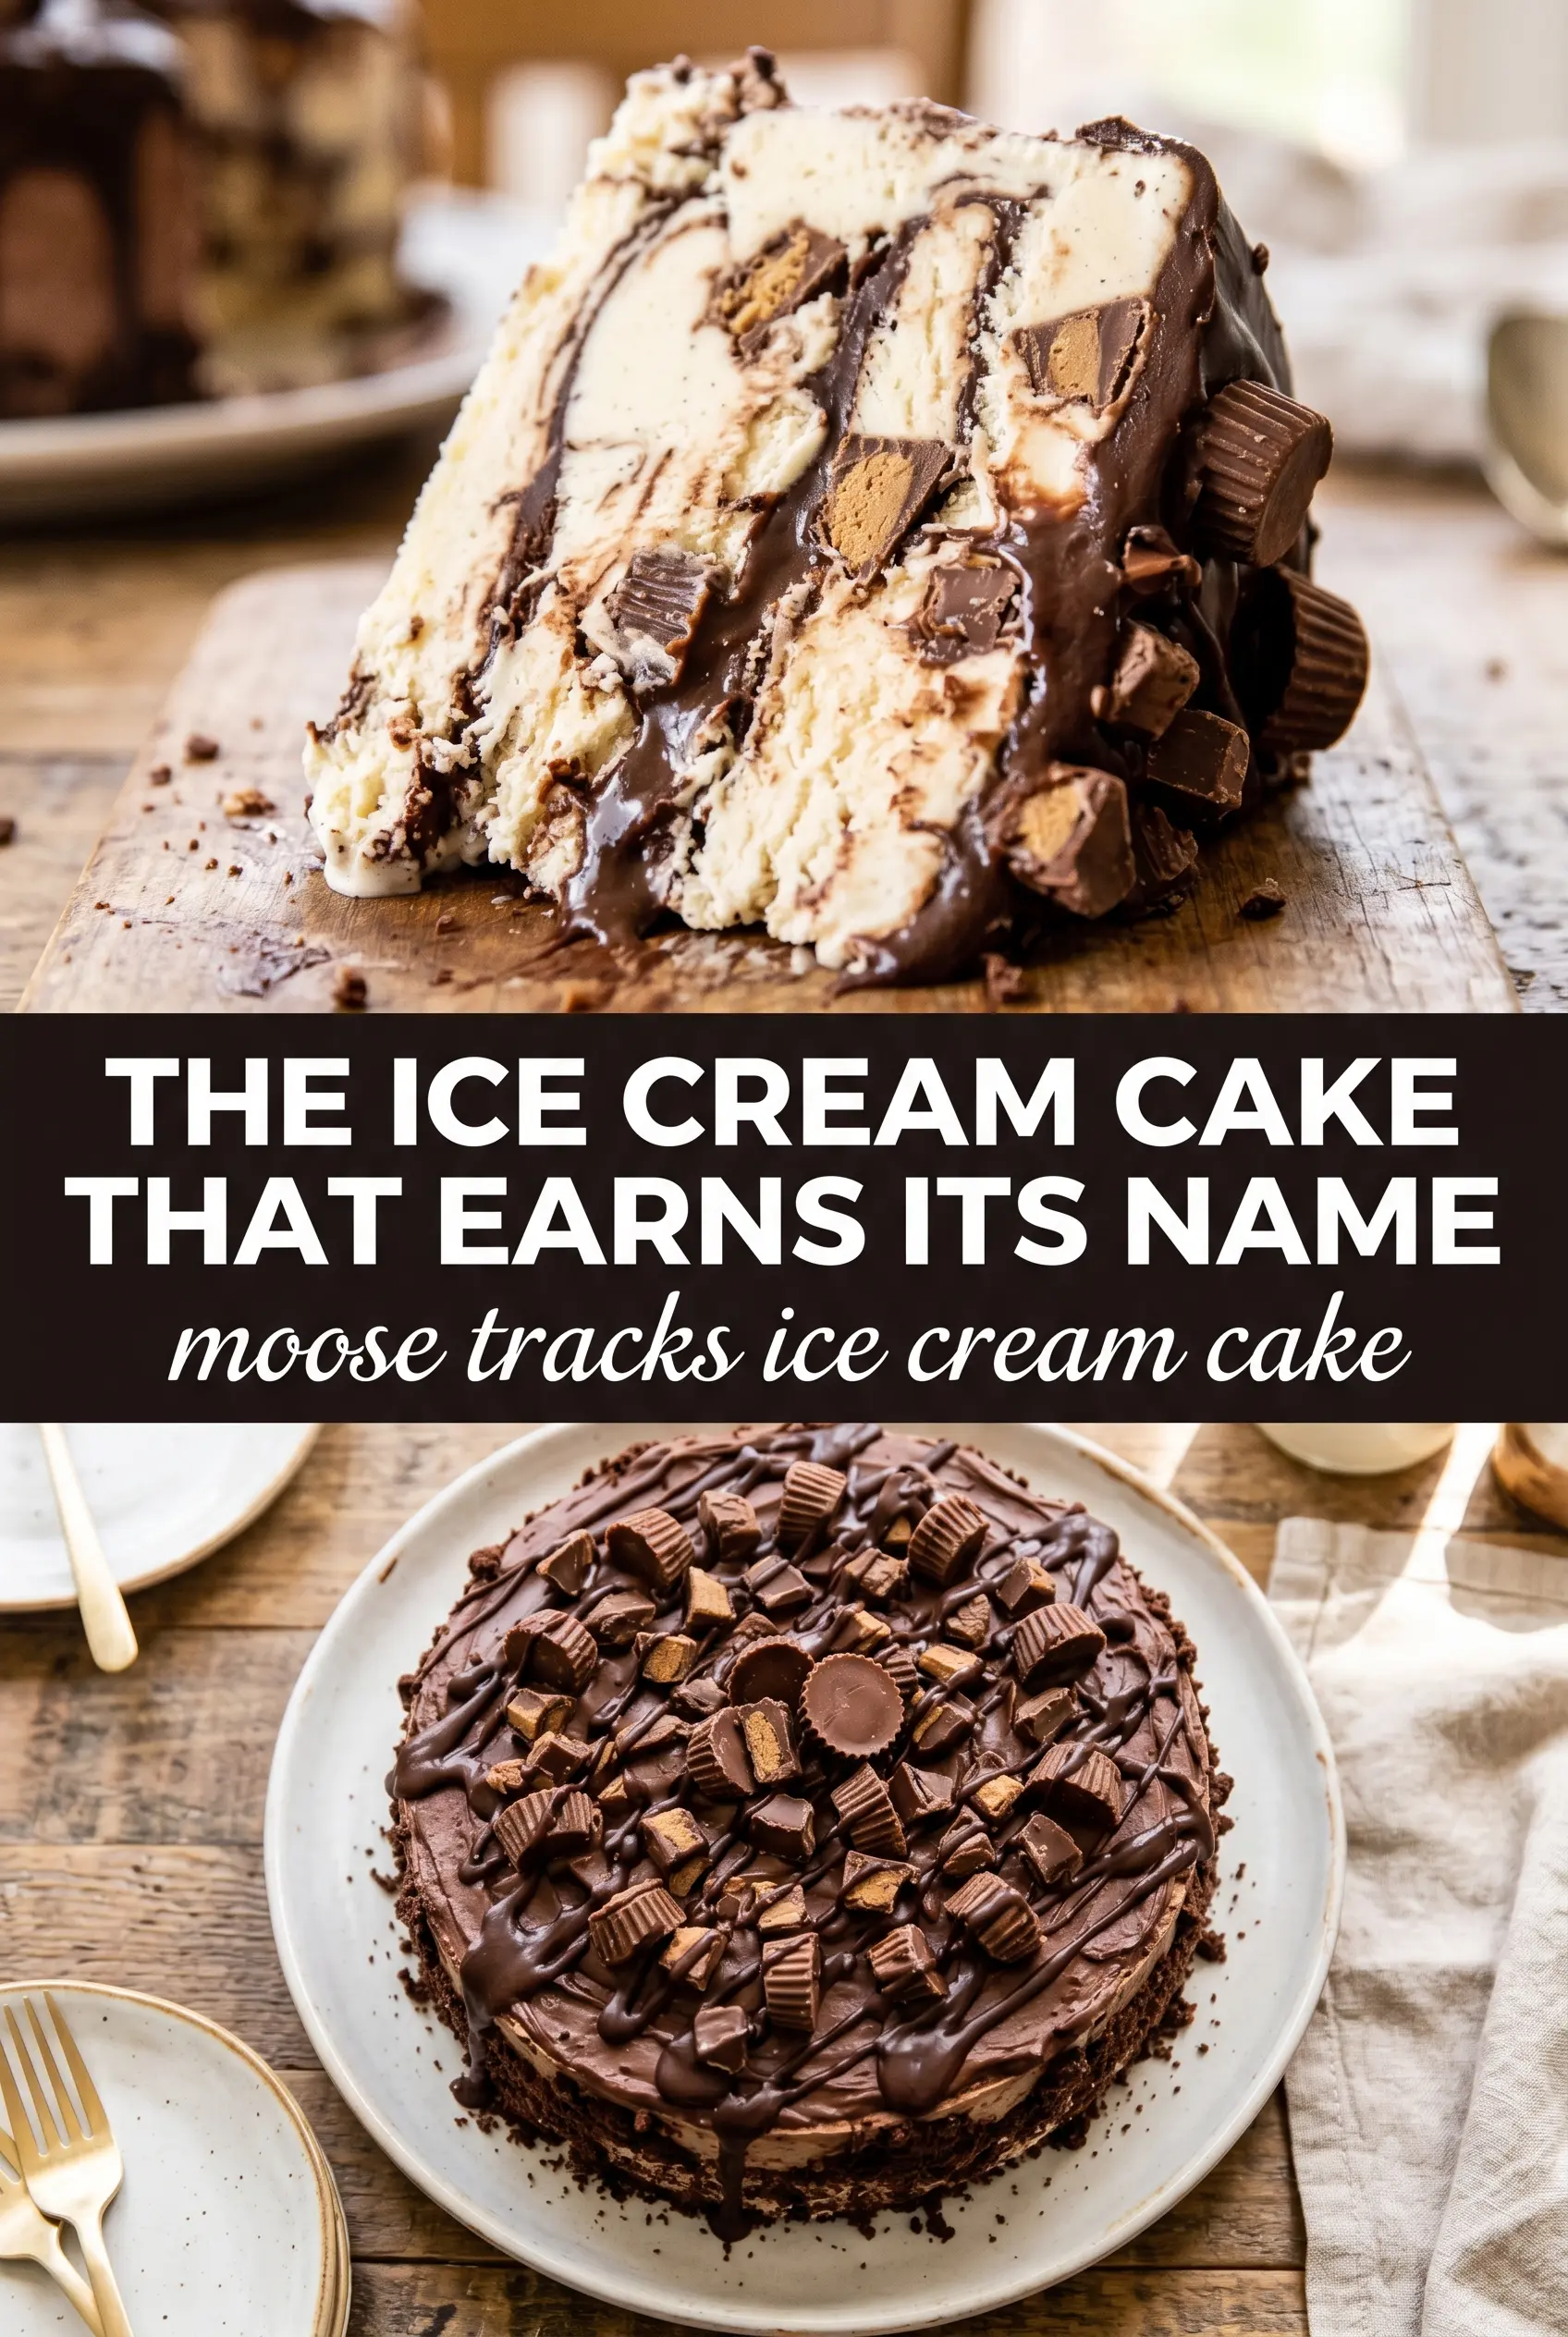
Moose Tracks ice cream cake hits that perfect middle ground between nostalgic and over-the-top: a crunchy Oreo crust, cold vanilla ice cream swirled with thick fudge, and little pockets of peanut butter cup pieces in every slice. The texture is the part that keeps people coming back. You get the clean snap of the crust, then creamy layers that hold their shape instead of melting into a puddle the second they hit the plate.
The trick is keeping the ice cream soft enough to spread but not so loose that the fudge disappears into it. I like folding the fudge and peanut butter cups in at the very end so you still get distinct ribbons and chunks instead of one muddy brown layer. Freezing between layers matters here, too. That’s what gives you those neat slices and keeps the topping from sliding off when you cut into it.
Below, I’m walking through the little details that make this cake slice cleanly and taste like the ice cream shop version people remember. The crust, the swirl, and the final freeze all do different jobs, and once you know why, this cake becomes easy to repeat.
The fudge stayed in those pretty ribbons instead of disappearing, and the slices held their shape after I let it freeze overnight. My kids kept asking for “just one more sliver.”
Love the creamy vanilla, fudge ribbons, and peanut butter cup layers? Save this Moose Tracks ice cream cake for your next birthday or summer dessert table.
Why the Ice Cream Has to Be Soft, Not Melted
The biggest mistake with an ice cream cake is trying to spread rock-hard ice cream or letting it get soupy on the counter. Rock-hard ice cream tears the crust and leaves gaps. Soupy ice cream turns the whole cake looser, and the fudge swirls sink instead of staying visible. The sweet spot is softened enough that it spreads in thick scoops, but still cold and bodyful.
That matters even more once the fudge and peanut butter cups go in. When the ice cream holds a little structure, the mix-ins stay suspended instead of dropping to the bottom. The freezer does the rest of the work. If you rush this step, the cake can still taste good, but the slices won’t look like the clean layered dessert you were aiming for.
- Oreos — These make a sturdy crust without baking. Use the whole cookie, filling and all. The cream helps bind the crumbs once the butter goes in.
- Unsalted butter — This is the glue that keeps the crust from crumbling when you slice it. Melted salted butter works in a pinch, but unsalted gives you more control since the cookies already bring sweetness.
- Vanilla ice cream — This is the base, so buy a good one if you can. A dense ice cream freezes with a cleaner slice than a very airy one. Let it soften on the counter just until it bends under a spoon.
- Moose Tracks fudge sauce or hot fudge — Use a fudge sauce that stays thick when cold. Thin chocolate syrup won’t give you the same ribbons or pockets of rich chocolate.
- Miniature peanut butter cups — Halving them keeps the pieces distributed through the cake. Whole candies are harder to cut cleanly and tend to make the slices fall apart.
- Whipped topping — This makes a smooth, easy finish that freezes well. Homemade whipped cream can work, but it softens faster and is best added close to serving.
What Each Ingredient Is Actually Doing in This Ice Cream Cake

- Crust or base layer (cookies, brownies, or cake) — This provides structure and texture contrast. A sturdy base keeps the whole cake from crumbling when served.
- Ice cream (the main event) — Choose quality ice cream or frozen yogurt. Soft-serve or premium ice cream works better than hard-packed store brands.
- Cake layer (optional but recommended) — A thin cake layer adds substance and keeps the cake from being all frozen texture. Make it thin so it doesn’t overpower the ice cream.
- Sauce or syrup layer (fudge, caramel, or fruit) — This adds flavor depth and prevents the cake from tasting one-dimensional. Freeze between layers so sauces stay distinct.
- Toppings (chocolate chips, cookies, candy, or nuts) — These add texture and visual appeal. Mix-ins stay crispy longer if frozen separately first.
- Frosting or whipped cream (optional topping) — This adds richness to the outside. Keep it simple or it overwhelms the cake.
- Freezing time (the patience that pays off) — Each layer needs time to set so they stay distinct when sliced. Rushing this step means layers muddy together.
- Storage and serving technique (thaw 5 minutes before slicing) — A brief thaw makes slicing clean and easy. Serve slices immediately for best texture.
Building the Layers So the Cake Slices Cleanly
Pressing the Crust
Mix the crushed Oreos with the melted butter until every crumb looks evenly damp. Press it firmly into the bottom of a 9-inch springform pan, especially around the edges where loose crumbs like to break away. A flat-bottomed glass helps here. If the crust feels sandy, it needs a little more butter; if it looks greasy, you’ve gone too far and should add a few more crumbs.
Folding the Filling
Work with ice cream that has softened enough to stir but still feels cold and heavy. Fold in the peanut butter cups and half the fudge sauce with a spatula, using big sweeping turns so you don’t beat all the air out. You want visible streaks of fudge, not a uniform chocolate color. If the mixture gets too loose, slide the bowl into the freezer for 5 to 10 minutes before spreading it over the crust.
Swirling and Freezing
Spread the ice cream mixture over the crust, then drizzle the remaining fudge sauce on top and drag a knife through it a few times. Don’t over-swirl or the dark ribbons disappear. Freeze the cake until it’s completely firm, not just set on top. The center needs that full freeze or the slice will slump the moment it leaves the pan.
Finishing the Top
Add the whipped topping only after the cake has firmed up. If you add it too early, the topping can sink into the ice cream and smear when you spread it. Decorate with extra peanut butter cups and a final drizzle of fudge, then freeze again so the garnish locks in place. That second freeze is what keeps the top neat when you move the cake to the table.
How to Adapt This Cake for Different Freezers, Diets, and Occasions
Dairy-Free Version
Use a coconut- or almond-based vanilla ice cream and a dairy-free whipped topping. The texture will be a little softer and the flavor less classic dairy-ice-cream rich, but the chocolate-peanut butter combo still carries the dessert. Check that your fudge sauce is dairy-free too, since many hot fudge brands contain milk.
Gluten-Free Crust Swap
Swap in gluten-free chocolate sandwich cookies for the crust. The method stays the same, but let the crushed cookies sit with the butter for a minute before pressing them into the pan so the crumbs hydrate and pack tighter. It won’t taste exactly like Oreos, but it still gives you that dark, sturdy base.
Make It More Chocolate-Heavy
Replace half the vanilla ice cream with chocolate ice cream if you want a deeper, more intense chocolate finish. The cake will taste less like the classic Moose Tracks flavor and more like a peanut butter cup sundae in frozen form. Keep the fudge swirls a little thicker so they don’t vanish into the darker base.
Storage and Reheating
- Refrigerator: Not recommended. This is a frozen dessert, and even a short stay in the fridge will soften the layers and blur the slices.
- Freezer: Wrap the cake tightly and store it for up to 2 weeks. For the cleanest slices, keep it in the springform pan until fully set, then remove and rewrap well.
- Reheating: No reheating needed. Let the cake sit at room temperature for 8 to 12 minutes before slicing. If you cut it straight from the freezer, the knife will crack the crust and the filling will be too hard to serve neatly.
Answers to the Questions Worth Asking
Moose Tracks Ice Cream Cake
Ingredients
Equipment
Method
- Press the crushed Oreo cookies and melted butter into a 9-inch springform pan to form an even crust, then pack it firmly with the back of a spoon. Freeze for 15 minutes until set.
- Fold the peanut butter cup halves and half of the fudge sauce into the softened vanilla ice cream until evenly speckled with peanut butter pieces. Spread the mixture over the chilled Oreo crust in a smooth, level layer.
- Drizzle the remaining fudge sauce over the ice cream and swirl it lightly with a knife to create dark ribbon streaks. Leave visible swirls so each slice shows the pattern.
- Freeze for 4 hours until completely firm to prevent the ice cream from tearing when topped. The surface should feel solid all the way through.
- Spread the whipped topping over the frozen cake in an even layer. Decorate with extra peanut butter cups and a fudge drizzle for a finished look.
- Freeze for 2 more hours before serving so the topping sets and the cake cuts cleanly. Let it sit at room temperature for 5 minutes for easier slicing if needed.


