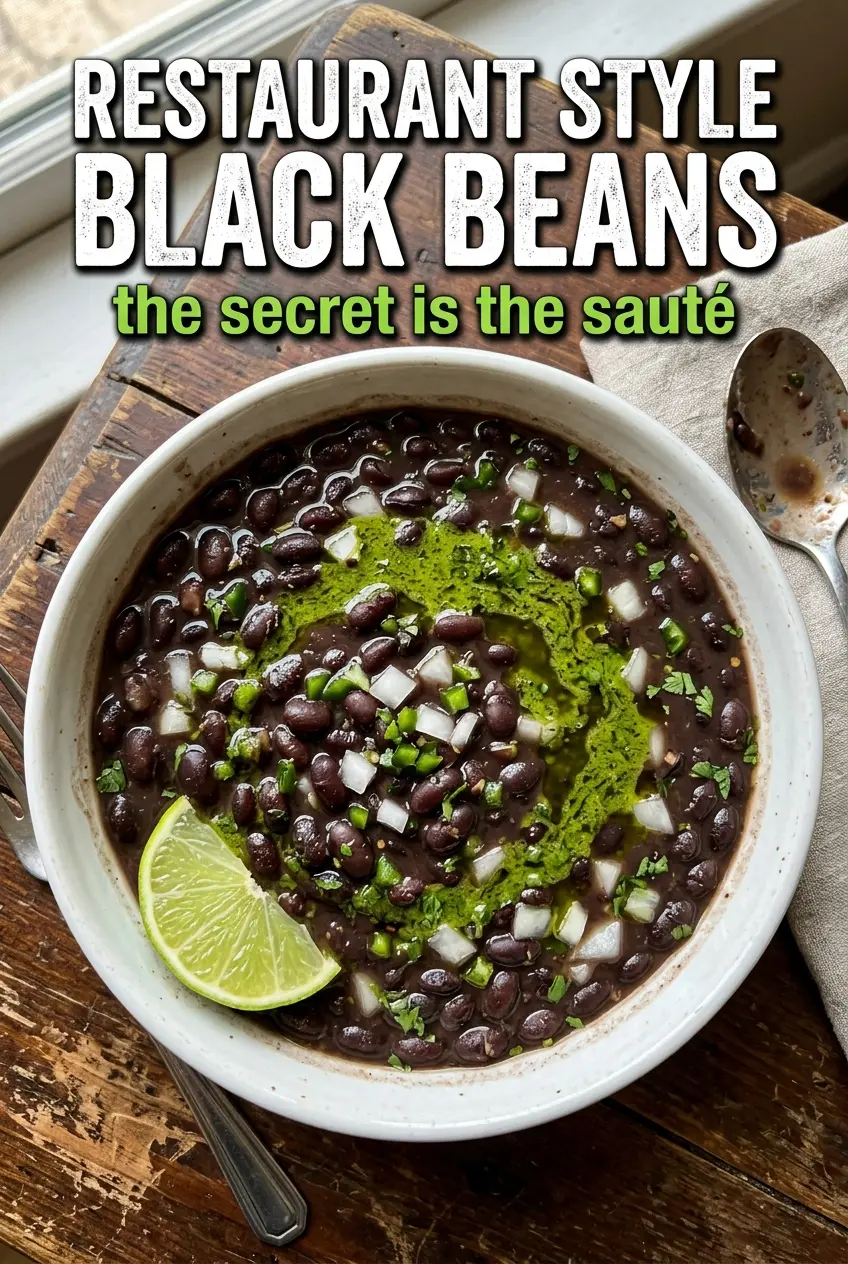
These restaurant style black beans come out glossy, creamy, and full of that slow-simmered flavor you usually only get when beans have been hanging out on the stove all afternoon. The texture is the whole point here: some beans stay intact, some break down just enough to thicken the pot, and the broth turns into a savory sauce that clings instead of pooling at the bottom of the bowl.
The trick is starting with plenty of olive oil, letting the onion soften before the garlic goes in, and simmering the beans uncovered long enough for the liquid to concentrate. Mashing only part of the pot gives you that signature creamy body without turning everything to paste. A final hit of lime wakes up the beans at the end, and the cilantro keeps the flavor fresh instead of flat.
Below, you’ll find the small details that make these beans taste like they came from a good Mexican restaurant, plus a few smart swaps and storage notes that make them easy to keep in your regular rotation.
The beans thickened up exactly right after I mashed a few against the side of the pot, and the lime at the end kept them from tasting heavy. I served them with rice and my husband went back for seconds before I even sat down.
Save these restaurant style black beans for taco night, rice bowls, and any meal that needs a creamy, savory side with a little lime at the end.
The Part That Keeps These Beans Creamy Instead of Soupy
The biggest mistake with canned beans is rushing the simmer. If the liquid never has time to reduce, you end up with beans floating in broth instead of beans coated in a thick, savory sauce. Uncovering the pot matters here because evaporation is doing half the work.
The second thing that changes everything is the partial mash. If you mash all of the beans, the texture turns dense and pasty. If you mash none of them, the broth stays thin. Breaking down about a quarter of the beans gives you a creamy base that feels like it cooked much longer than 20 minutes.
- Uncovered simmering — This lets the broth concentrate. Covered beans trap steam and stay watery.
- Partial mashing — Mash against the side of the pot near the end, when the beans are soft and the liquid has already reduced a bit.
- Final lime juice — Acid sharpens the finished beans and keeps the flavor from tasting heavy after the simmer.
What Each Ingredient Is Doing in the Pot
- Black beans — Canned beans are the shortcut that makes this weeknight-friendly. Rinsing them removes the canning liquid so the finished pot tastes cleaner and less muddy.
- Olive oil — The oil gives the onion and garlic a chance to soften and carry flavor through the whole dish. You need enough here; this isn’t a low-fat skillet situation.
- White onion — Quartering the onion lets it perfume the pot without disappearing completely. If all you have is yellow onion, use it. The flavor will be a touch sweeter, which still works.
- Garlic — Fresh garlic matters more than powder in this recipe because it hits early and seasons the oil. Keep the heat moderate so it turns fragrant instead of bitter.
- Bay leaves and cumin — Bay gives the beans a deeper background note, and cumin brings the warm, earthy flavor people expect from restaurant-style beans. Dried oregano can be added too, but it will shift the flavor more toward a different style of bean.
- Broth — Vegetable broth keeps the beans vegetarian, while chicken broth adds a little extra savoriness. Water will work in a pinch, but the beans taste flatter and need more salt to wake up.
- Cilantro and lime — These go in at the end so they stay bright. If cilantro tastes like soap to you, skip it and add a little extra lime plus a pinch of chopped green onion.
Building the Beans From Aromatic Base to Silky Finish
Softening the Onion First
Warm the olive oil in a large pot over medium heat, then add the quartered onion and cook it until the edges turn glossy and the pieces start to soften. You’re not browning the onion hard here; you’re laying down a sweet, savory base. If the onion starts to scorch, the heat is too high and the garlic that follows will turn bitter fast.
Blooming the Garlic and Spices
Add the minced garlic and cook it just until fragrant, about a minute. Then stir in the cumin, pepper, salt, bay leaves, beans, and broth. The spices should smell toasted and warm almost immediately; if they smell burnt, pull the pot off the heat for a moment before continuing.
Letting the Broth Reduce
Bring the pot to a simmer and leave it uncovered for about 20 minutes, stirring now and then so the beans on the bottom don’t stick. This is when the broth turns from thin and watery to something spoonable. If the heat is too low, nothing thickens; if it boils hard, the beans can split and the pot gets grainy instead of creamy.
Mashing and Finishing the Pot
Mash about a quarter of the beans against the side of the pot, then stir in the cilantro and lime juice. Taste after the lime goes in, because the acid changes how salty the beans seem. Pull out the bay leaves before serving, and serve the beans hot while the sauce still looks glossy and loose enough to spoon over rice.
How to Adapt These Beans Without Losing the Restaurant-Style Texture
Make Them Vegetarian or Vegan
Use vegetable broth instead of chicken broth and the beans stay fully plant-based without losing body. The key is still the simmer and partial mash, since the creaminess comes from the beans themselves, not dairy.
Use Dried Beans Instead of Canned
Cook about 4 1/2 cups of cooked black beans and use them in place of the canned beans. Dried beans give you a deeper flavor, but the total time jumps because you need to soak and cook them first. Save some of the bean cooking liquid to replace part of the broth if you want even more richness.
Add Heat Without Changing the Base
Stir in a pinch of crushed red pepper, chopped jalapeño, or a little chipotle in adobo when the garlic goes in. That adds a smoky edge and a little bite, but it can overpower the bean flavor if you use too much, so start small.
Storage and Reheating
- Refrigerator: Store in an airtight container for up to 4 days. The beans thicken as they sit.
- Freezer: They freeze well for up to 3 months. Cool completely, portion into freezer-safe containers, and leave a little space at the top for expansion.
- Reheating: Warm gently on the stove with a splash of broth or water to loosen the texture. The common mistake is blasting them over high heat, which dries out the edges before the center is hot.
Questions I Get Asked About This Recipe
Restaurant Style Black Beans
Ingredients
Equipment
Method
- Heat the olive oil in a large pot over medium heat. Add the quartered onion and cook for 2 minutes.
- Add the minced garlic and cook for 1 minute, stirring as needed, until fragrant.
- Add the drained black beans, bay leaves, cumin, black pepper, salt, and broth to the pot. Bring everything to a simmer.
- Cook uncovered for 20 minutes, stirring occasionally, until the mixture looks glossy and thickening.
- Mash about 1/4 of the beans against the side of the pot to create a creamy consistency while keeping some beans whole. You should still see distinct bean pieces throughout.
- Taste the beans and adjust seasonings with lime juice. Remove the bay leaves and stir in the chopped cilantro.
- Serve the black beans hot. Garnish with extra cilantro if desired for visible green flecks on top.