American flag taco dip turns a basic layered dip into the kind of appetizer people circle back to before the chips even hit the table. The layers stay cool and sturdy, the toppings look sharp and festive, and every scoop gets beans, tangy cream cheese, guacamole, and salsa in one bite. It’s the sort of party food that disappears fast because it tastes as good as it looks.
The trick is building each layer with enough structure to hold the flag design. Softened cream cheese blends smoothly with the taco seasoning, the guacamole sits between sturdier layers instead of getting buried, and the sour cream stripes stay cleaner after a short chill. A rectangular dish matters here because the flag pattern needs straight edges to read clearly.
Below, I’ll walk through the layering order that keeps the dip from sliding around, the best way to pipe the sour cream stripes, and a few swaps that still give you a strong red, white, and blue presentation.
The layers held their shape after chilling, and the sour cream stripes stayed neat instead of melting into the salsa. I brought this to our July cookout and people kept asking how I got the flag to look so clean.
Save this American flag taco dip for your next cookout when you want a chilled party dip with crisp stripes and a strong Tex-Mex layer.
The Layer Order That Keeps the Flag from Sliding Apart
The biggest mistake with flag dip is putting the loose, wet layers on top too early. Salsa, pico, and even juicy tomatoes will creep into the stripes if they sit directly on soft cream layers without a little structure underneath. The cream cheese mixture and guacamole act like a buffer, and the brief chill helps everything settle before you decorate.
Another thing that matters here is the dish shape. A deep bowl hides the flag and traps the layers together unevenly. A shallow rectangular dish gives you the clean edges and flat surface you need for the stripes and blue corner to look intentional instead of crowded.
What Each Ingredient Is Actually Doing in This Dip
- Refried beans — This is the base that anchors the whole dip. A thicker bean layer holds the upper layers in place and gives each scoop a sturdy start.
- Cream cheese — Once softened, it mixes into the taco seasoning and makes a spreadable middle layer with enough body to support the guacamole. Cold cream cheese will leave lumps, so let it warm until it presses easily with a finger.
- Taco seasoning — This seasons the cream cheese layer without making the dip wet. A packet works fine here because you want even seasoning and a reliable Tex-Mex backbone.
- Guacamole — This adds richness and helps separate the cream layer from the cheese so the dip eats in defined bites instead of collapsing into one texture. If you’re using store-bought guacamole, choose one that’s thick rather than loose and salsa-heavy.
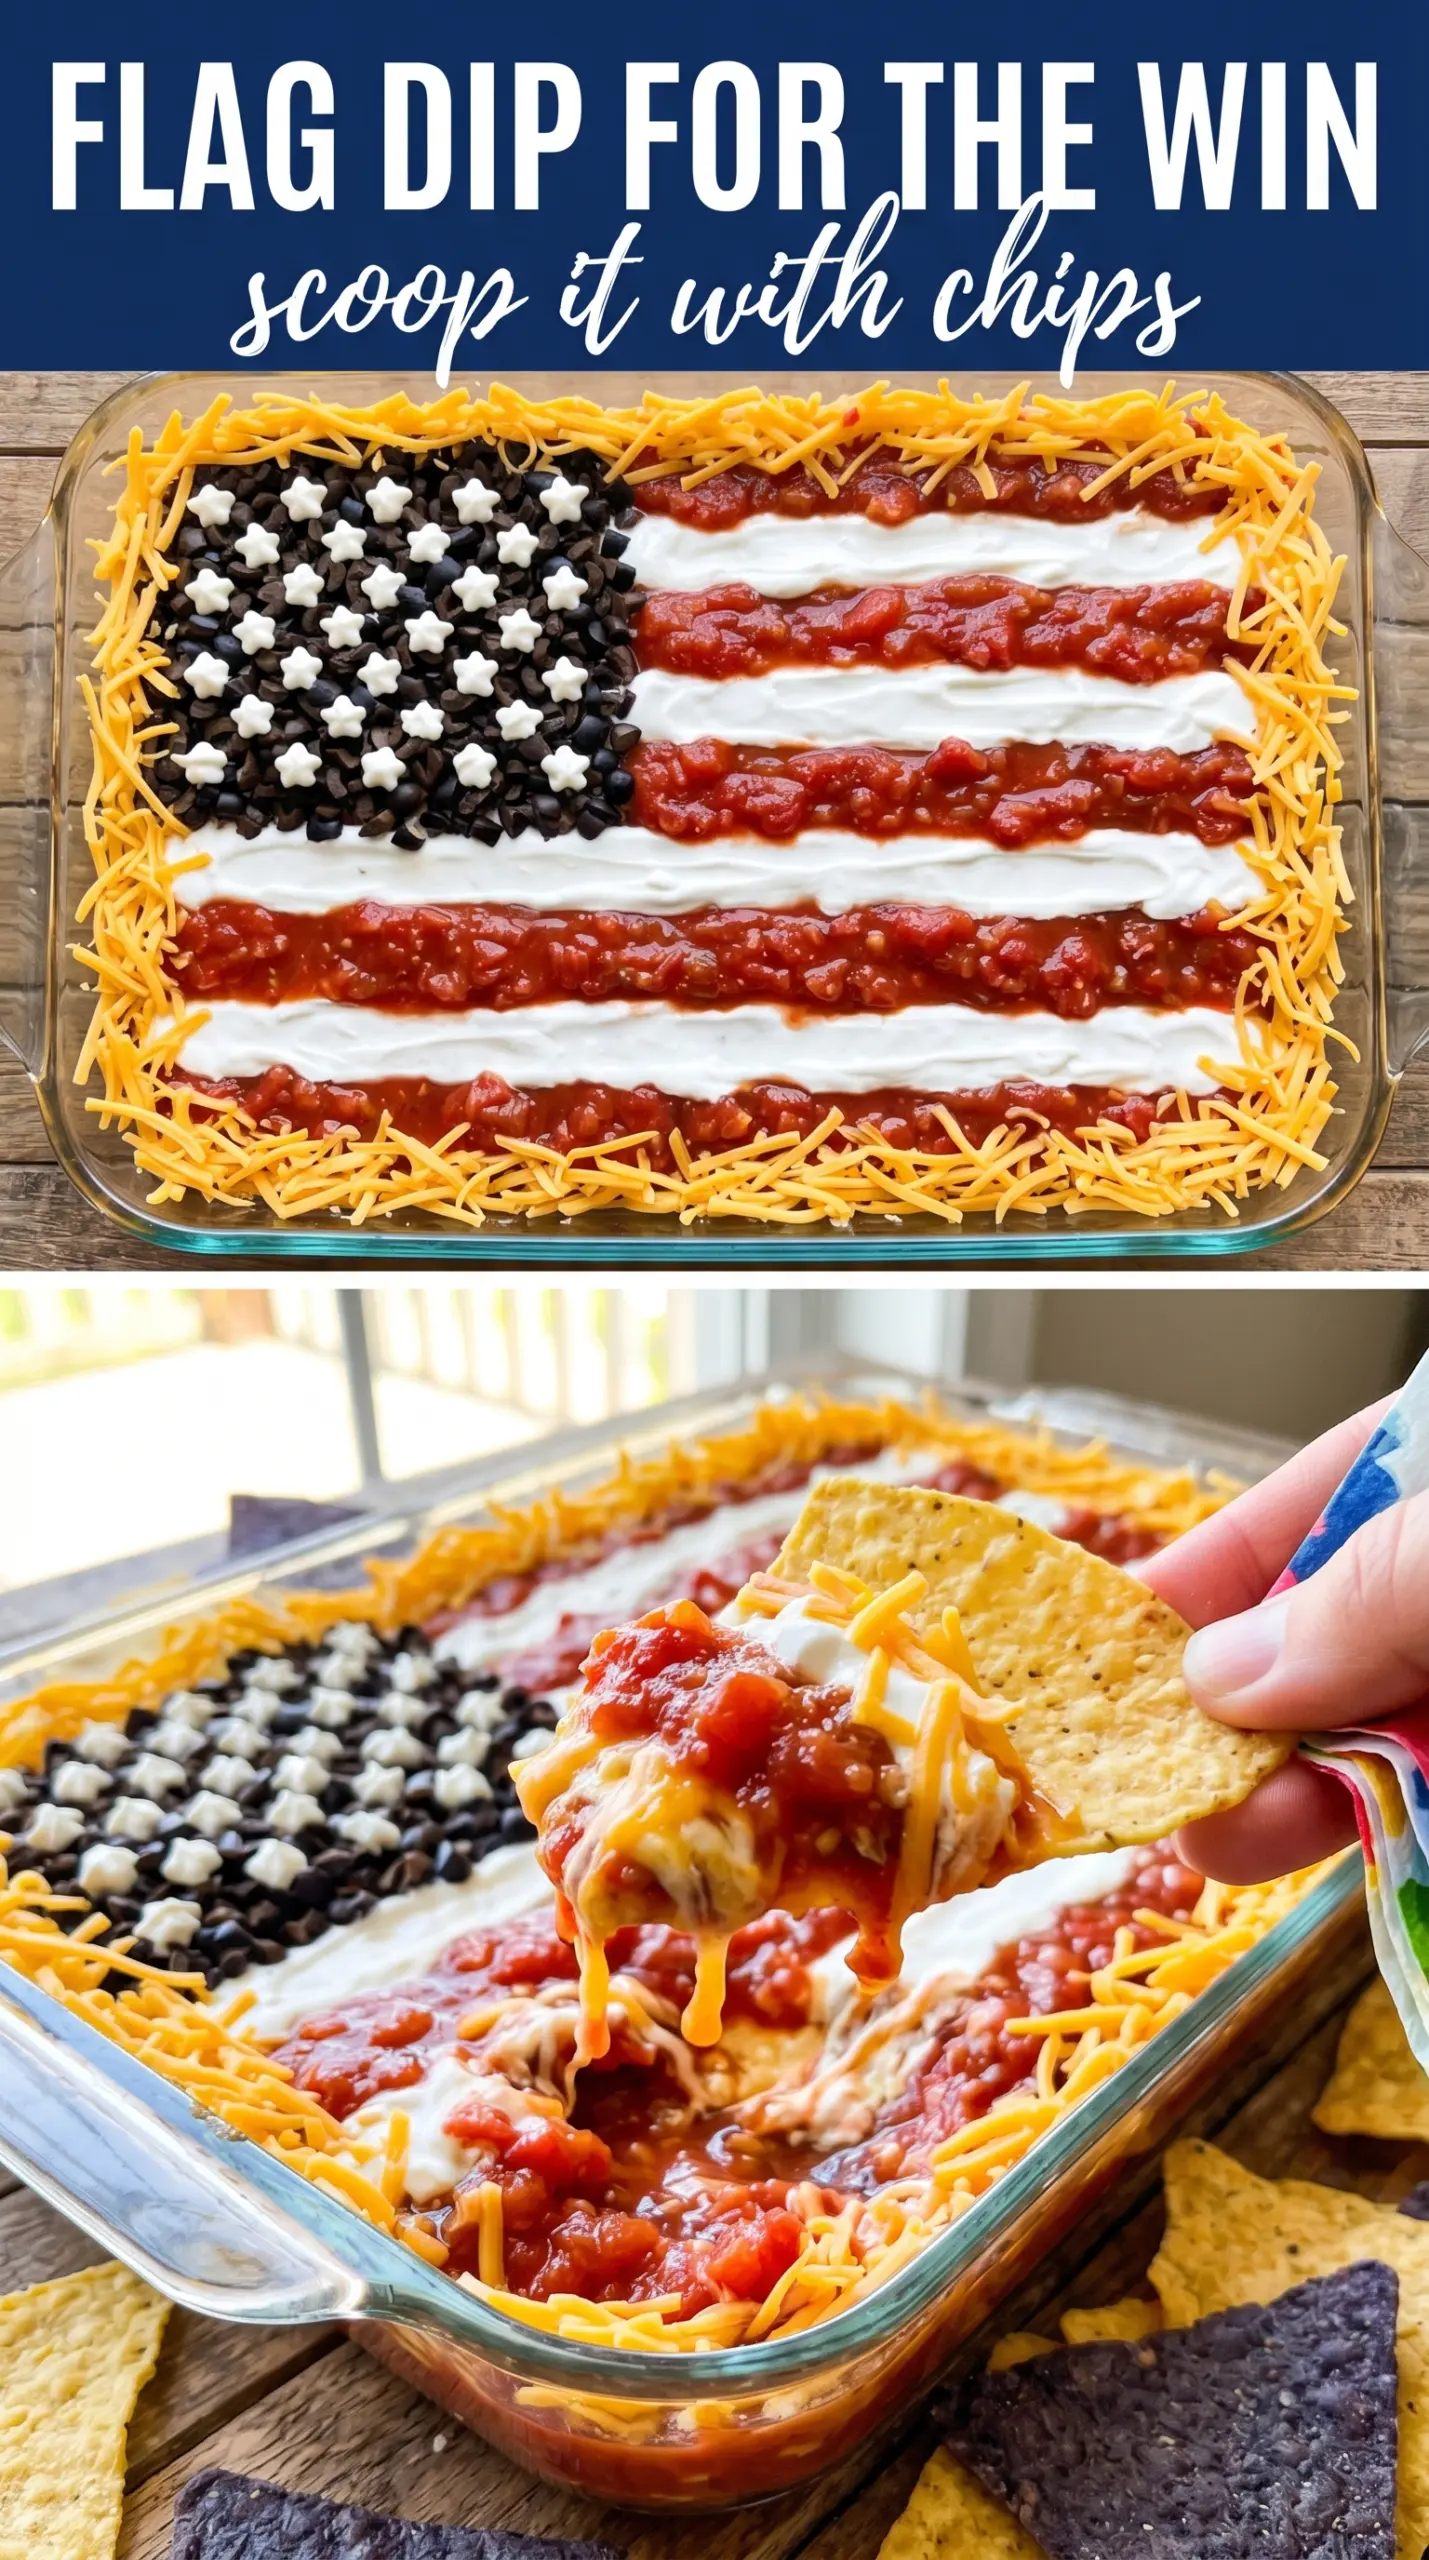
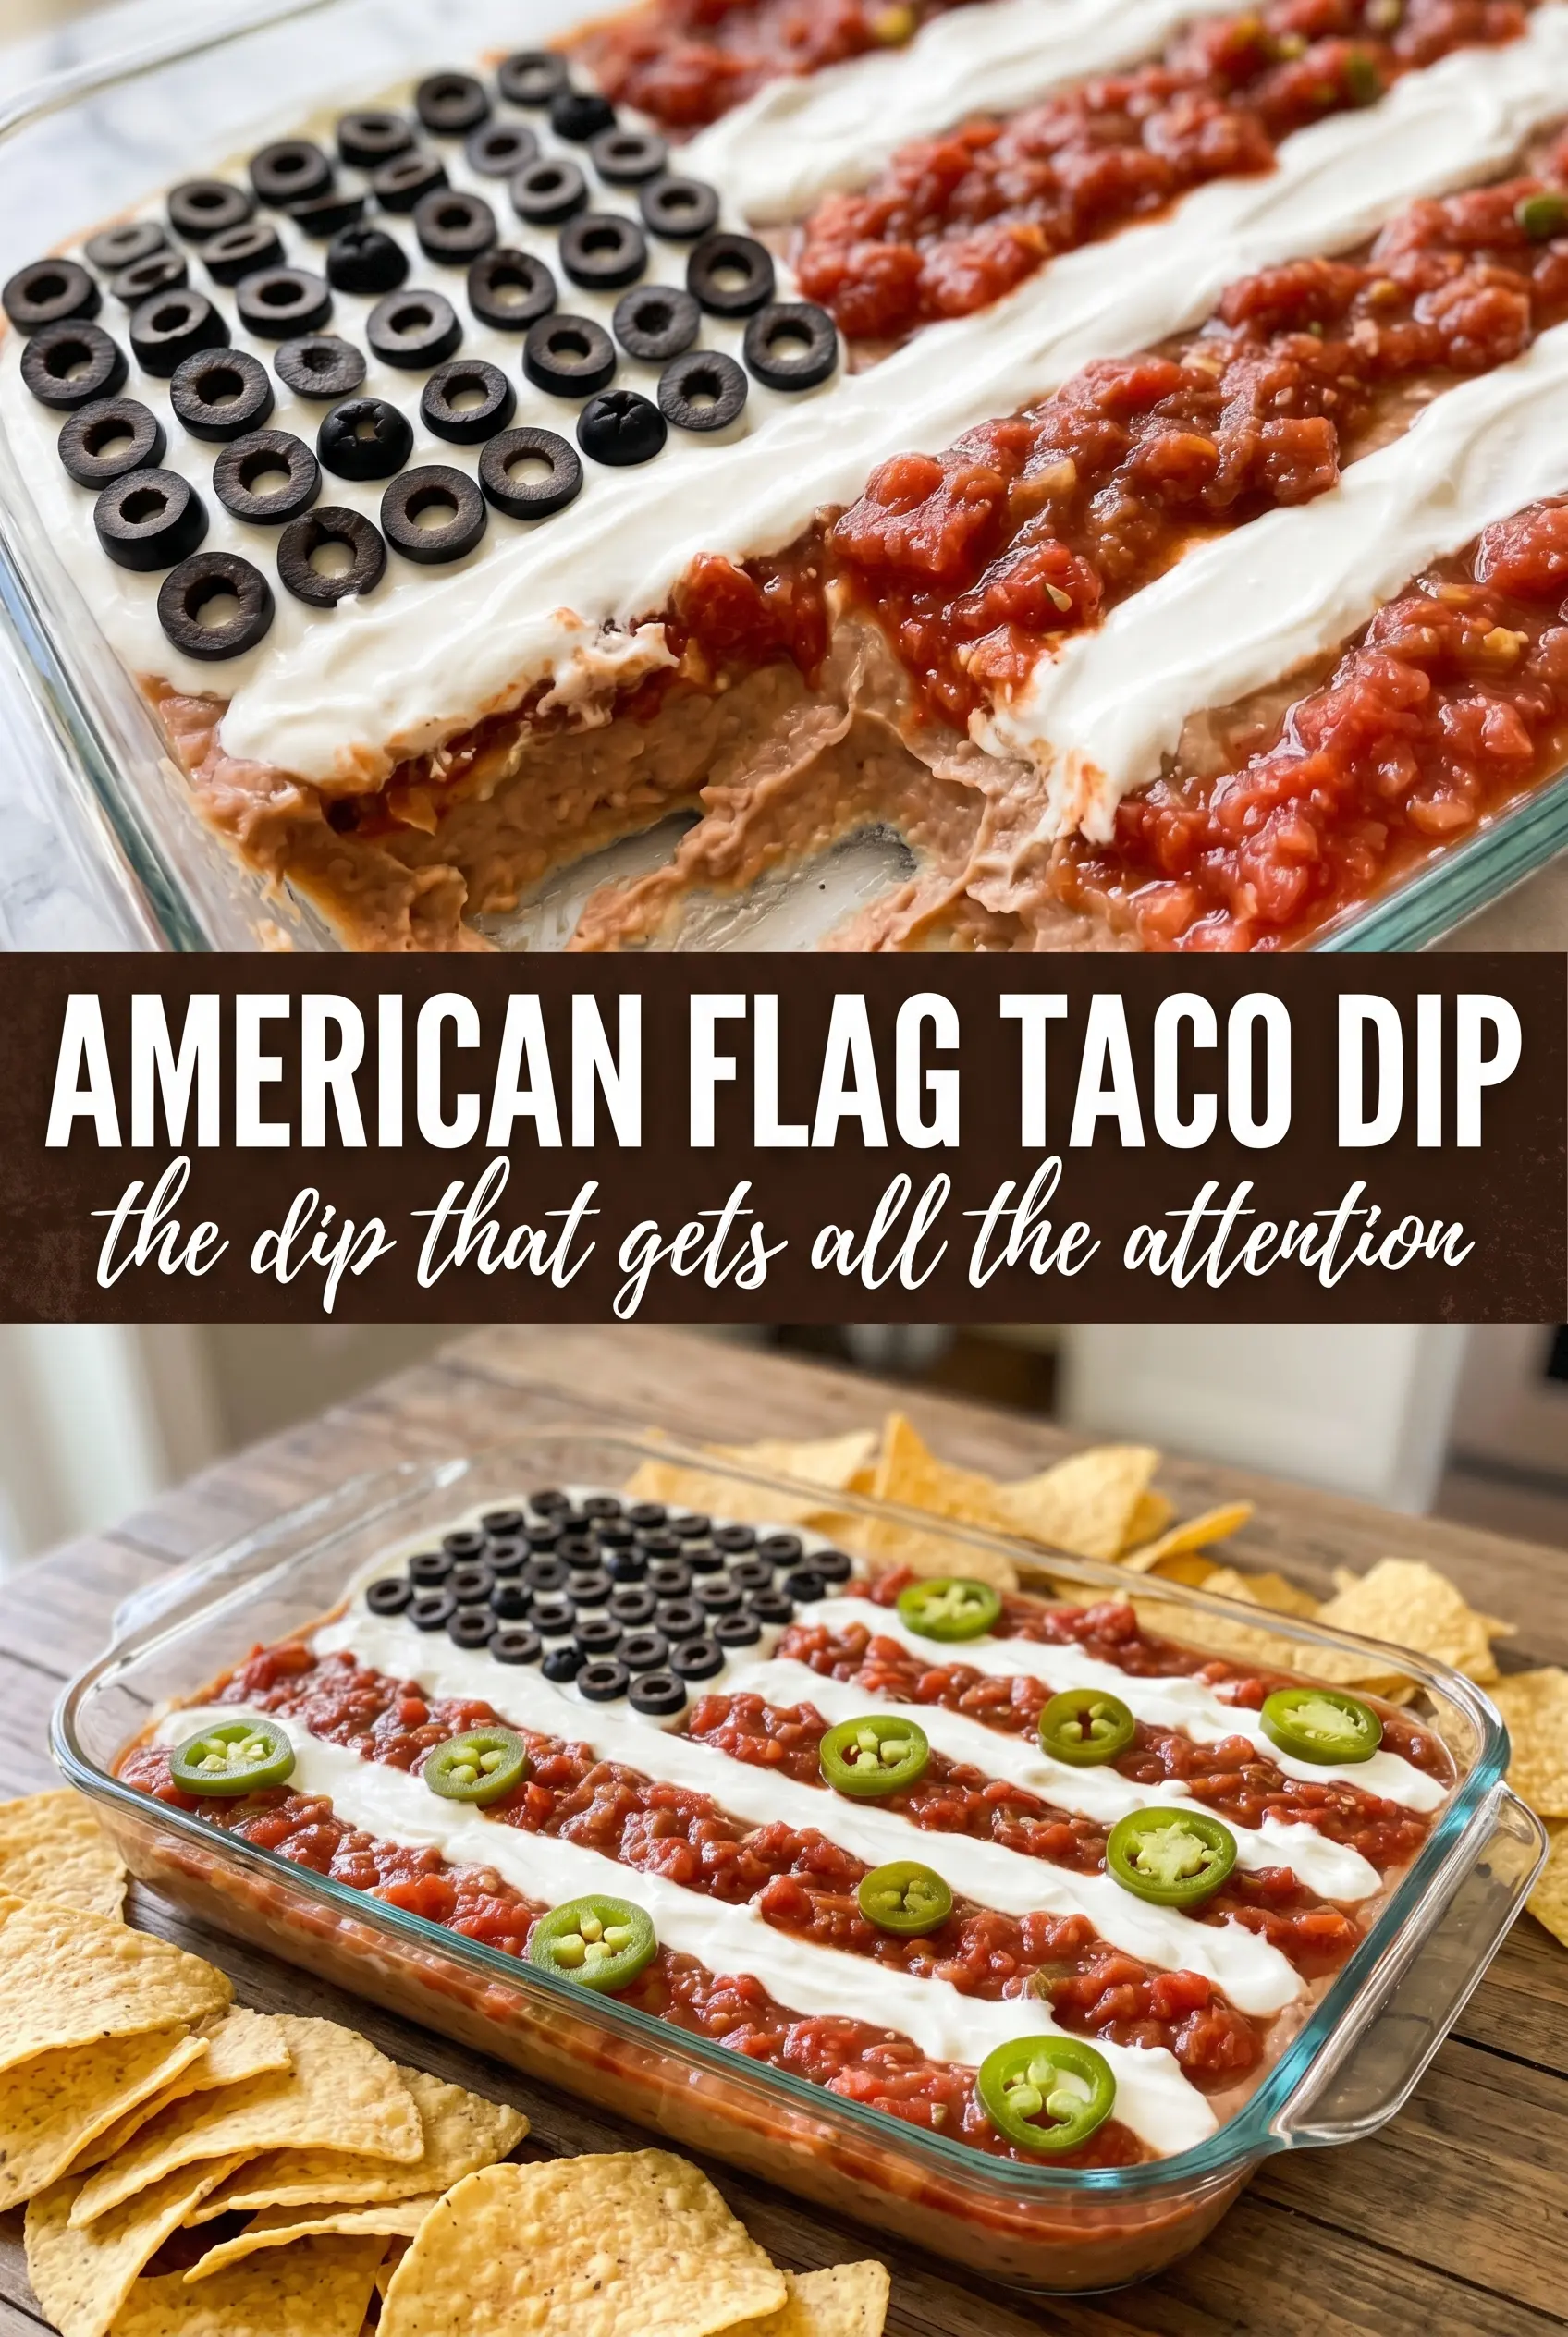
- Sour cream — Piped on top, it creates the white stripes that make the flag readable. Thicker sour cream holds its shape better than a thin tub, and you’ll get cleaner lines if you chill the dip after decorating.
- Chunky salsa or pico de gallo — This gives you the red stripes, but it needs to be drained if it’s watery. Extra liquid is what causes the flag pattern to blur.
- Black olives — These make the blue canton in a way that’s salty and visually bold. Slice them thin so they pack together tightly without rolling around.
- Cherry tomatoes or red bell pepper — Use these when you want brighter red stripes and less moisture than salsa. Bell pepper gives the cleanest look; tomatoes bring a juicier bite.
Building the Dip So the Flag Stays Sharp Until Serving Time
Pressing in the Bean Base
Spread the beans into an even layer and press them all the way to the corners of the dish. If the base is patchy, the top layers will sink into the gaps and the surface will look uneven. Use the back of a spoon or an offset spatula to smooth it flat before moving on.
Blending the Cream Cheese Layer
Stir the softened cream cheese with the taco seasoning until no streaks remain. The mixture should look smooth and spreadable, not crumbly or stiff. If it fights the spatula, it’s still too cold, and cold cream cheese is the fastest way to tear the bean layer below it.
Shaping the Flag Top
Spread the guacamole first, then the shredded cheese, so the top has a little structure before you pipe the white stripes. Spoon the sour cream into a bag and snip a small corner; a small opening gives you better control than a big one. Pipe the stripes slowly, because moving too fast makes them wobble and break the flag pattern.
Finishing with the Red and Blue Details
Add the salsa or diced tomato between the white lines, then tightly pack the olives into the upper left corner. Don’t scatter the olives; a dense cluster reads like the canton and looks much cleaner from overhead. Finish with green onions for a little color contrast, then chill the dip for 30 minutes so the surface settles and slices cleanly with a chip.
Three Ways to Adapt This American Flag Taco Dip
Dairy-Free Flag Dip
Use dairy-free cream cheese and sour cream, then choose a dairy-free shredded Mexican-style blend if you want the top to hold the same look. The texture will be slightly softer, so chilling matters even more before serving.
Gluten-Free Party Dip
The dip itself is naturally gluten-free as long as your taco seasoning is certified gluten-free. Serve it with corn tortilla chips and check labels on the salsa and seasoning packet if cross-contamination matters in your kitchen.
Make It Spicier
Add chopped pickled jalapeños between the bean and cream cheese layers or use a hot salsa for the red stripes. That keeps the heat in the dip instead of only on top, so every bite gets a little more kick.
Make-Ahead for a Crowd
Assemble the base layers a few hours ahead, then add the sour cream stripes, olives, and tomatoes closer to serving time. That keeps the design crisp and prevents the top from weeping into the white lines.
Storage and Reheating
- Refrigerator: Store covered for up to 3 days. The flag pattern will soften, but the flavor holds.
- Freezer: Not a good freezer dip. The dairy layers and guacamole separate after thawing, and the topping design will be lost.
- Reheating: Don’t reheat this dip. Serve it chilled or at cool room temperature, and add the decorative toppings after it has rested so the stripes stay defined.
Answers to the Questions Worth Asking
American Flag Taco Dip
Ingredients
Equipment
Method
- Spread the refried beans in an even layer across the bottom of a large rectangular baking dish or serving tray.
- Mix the softened cream cheese with the taco seasoning until smooth, then spread it evenly over the bean layer.
- Spread the guacamole over the cream cheese layer, then top with the shredded Mexican cheese blend.
- Spoon the sour cream into a piping bag or zip-lock bag with a corner snipped and pipe horizontal white stripes across the top of the dip.
- Add rows of salsa or diced red tomato between the sour cream stripes to create the red stripe effect.
- In the upper left corner, arrange the sliced black olives tightly to form the blue canton rectangle.
- Scatter the green onions across the top of the dip.
- Chill the dip for 30 minutes, then serve with tortilla chips.