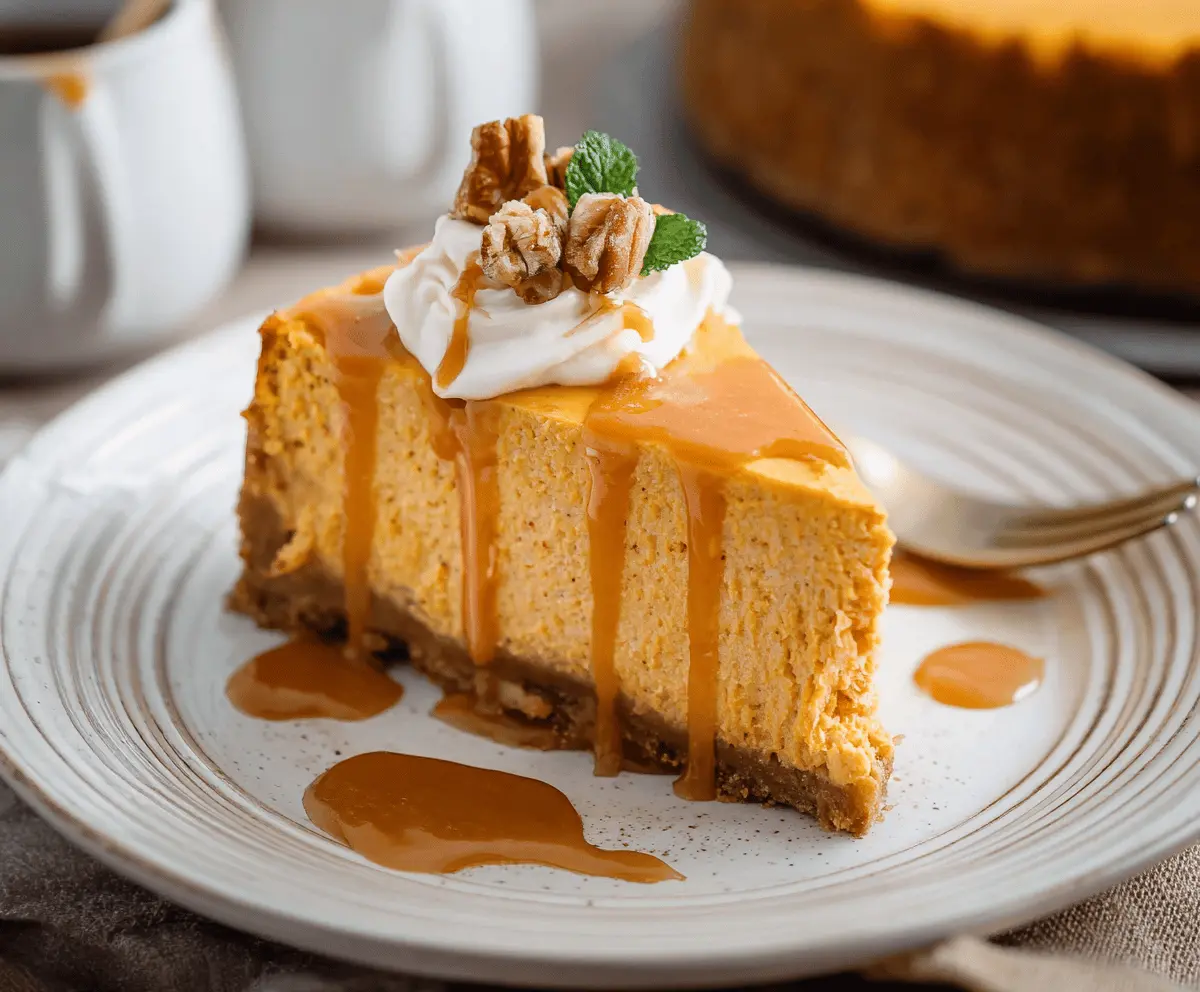
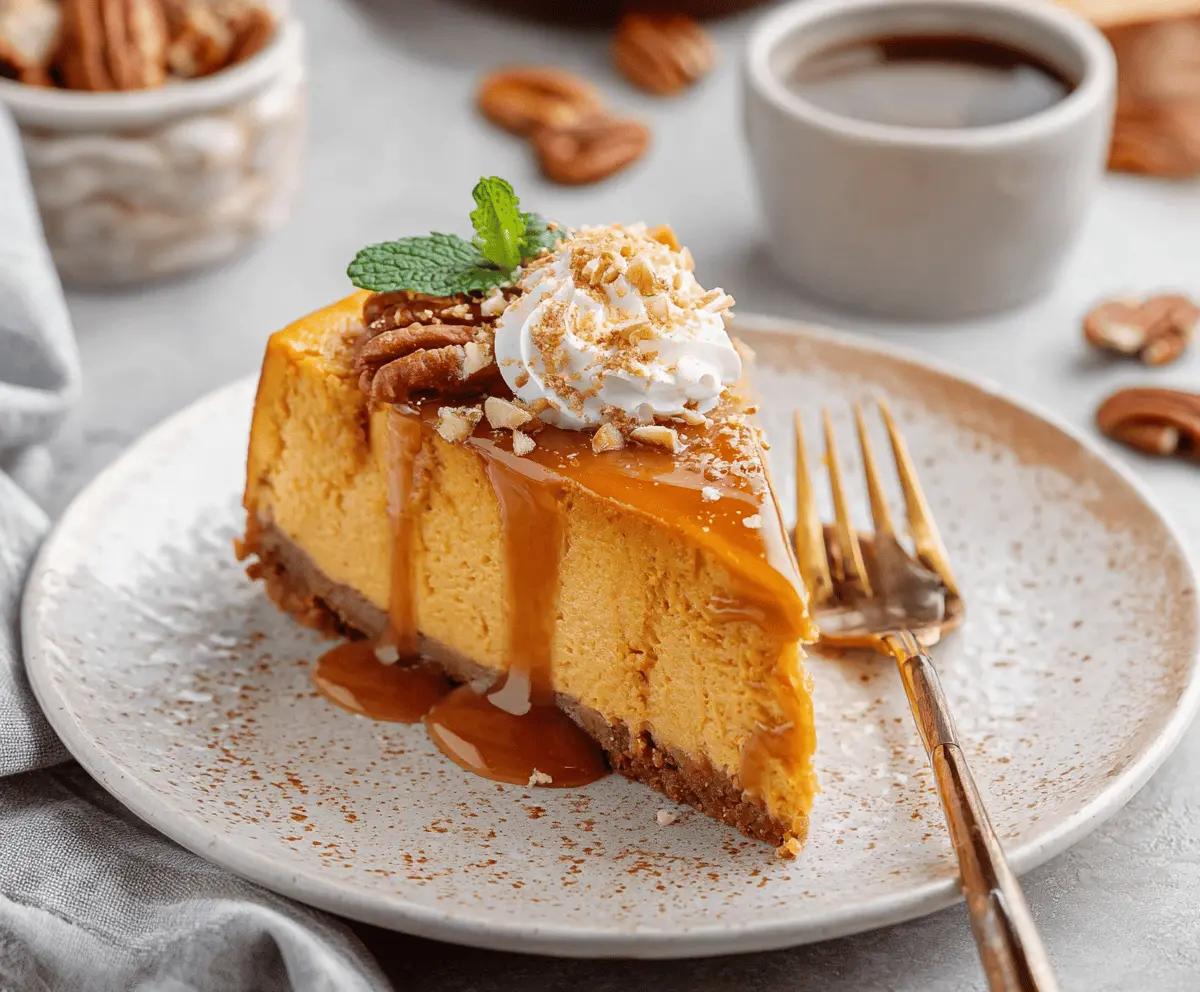
This Sweet Potato Cheesecake combines creamy goodness with the warm flavor of sweet potatoes. Its rich taste is a perfect treat for any occasion. Plus, that golden color is simply inviting!
I love how it feels cozy and comforting, just like a warm hug. It’s a great way to enjoy veggies in dessert form! Serve it with whipped cream for a special touch. Yum!
Key Ingredients & Substitutions
Sweet Potatoes: These add a unique flavor and creamy texture. You can substitute canned pumpkin if sweet potatoes aren’t available. Just make sure to adjust the spices as pumpkin has its own flavor profile.
Cream Cheese: This provides richness and creaminess. If you’re looking for a lighter option, you can use Neufchâtel cheese, which has less fat but still gives a deliciously creamy result.
Sour Cream: It adds tanginess and moisture. Greek yogurt can be an excellent substitute, giving a similar texture and taste, plus some extra protein!
Spices: The combination of cinnamon, nutmeg, and ginger gives warmth. Feel free to mix it up! Using pumpkin spice mix instead works well, too, to simplify things.
How Can I Prevent Cracks in My Cheesecake?
Preventing cracks in a cheesecake can be tricky. Here are some tips to keep your cheesecake looking smooth:
- Don’t overmix the batter once you add the eggs. Mix just until combined.
- Bake the cheesecake in a water bath. This helps maintain moisture and regulate the temperature while baking.
- When done baking, let the cheesecake cool in the oven with the door ajar for an hour. This gradual cooling prevents shrinkage and cracking.
Always remember to chill your cheesecake completely before slicing, as this helps set the filling and keeps those pesky cracks away!
Sweet Potato Cheesecake
Ingredients You’ll Need:
For The Crust:
- 1 ½ cups graham cracker crumbs
- ¼ cup granulated sugar
- 6 tbsp unsalted butter, melted
For The Sweet Potato Cheesecake Filling:
- 2 cups cooked and mashed sweet potatoes (about 2 medium sweet potatoes)
- 24 oz (3 packages) cream cheese, softened
- 1 cup granulated sugar
- 3 large eggs
- ½ cup brown sugar
- ½ cup sour cream
- 1 tsp vanilla extract
- 1 tsp ground cinnamon
- ½ tsp ground nutmeg
- ¼ tsp ground ginger
- Pinch of salt
For The Topping:
- Whipped cream (for serving)
- Walnut halves or pecans (for garnish)
- Caramel sauce (for drizzling)
- Fresh mint leaves (optional, for garnish)
How Much Time Will You Need?
This delightful cheesecake takes about 20 minutes to prepare, plus around 55-65 minutes of baking time. After baking, it needs a cooling period of 1 hour in the oven and at least 4 hours (or preferably overnight) in the fridge to set. So overall, prepare for a fun time in the kitchen followed by some patience while it chills. Totally worth it!
Step-by-Step Instructions:
1. Preheat Your Oven:
Start by preheating your oven to 325°F (160°C). While your oven warms up, lightly grease a 9-inch springform pan. This will help your cheesecake come out easily once it’s baked.
2. Prepare the Crust:
In a medium bowl, combine the graham cracker crumbs, granulated sugar, and melted butter. Mix it all together until the crumbs are nicely coated with butter. Then, press the mixture firmly and evenly into the bottom of the prepared springform pan to form a sturdy crust. Set this aside while you make the filling.
3. Create the Filling:
In a large bowl, use an electric mixer to beat the softened cream cheese until it’s smooth and creamy. This will take a couple of minutes. Next, add your mashed sweet potatoes to the mix and combine until it’s all well mixed and smooth.
4. Add the Sweeteners and Eggs:
Stir in the granulated sugar, brown sugar, and sour cream until everything is fully blended. Now, beat in the eggs one at a time on low speed, mixing just until each egg is incorporated (don’t overmix this step!).
5. Spice Things Up:
Fold in the vanilla extract, ground cinnamon, ground nutmeg, ground ginger, and a pinch of salt. Mix until the spices are evenly distributed throughout the batter.
6. Bake the Cheesecake:
Pour the filling over your prepared crust in the springform pan, smoothing the top with a spatula. Place it in the preheated oven and bake for about 55 to 65 minutes. The edges should be set, but the center can be slightly jiggly. This is normal!
7. Cool Down:
Once baked, turn off the oven and crack the door open. Let your cheesecake cool inside for about 1 hour. This helps to prevent cracks from forming on the top.
8. Chill & Set:
After the hour is up, remove the cheesecake from the oven and let it cool completely at room temperature. Once it’s cool, refrigerate it for at least 4 hours, but for best results, let it chill overnight to fully set.
9. Serve & Enjoy:
When you’re ready to serve, carefully remove the sides of the springform pan. Top each slice with a dollop of whipped cream, sprinkle a few walnut halves or pecans, drizzle with caramel sauce, and if you like, add a fresh mint leaf for a vibrant touch. Enjoy each creamy bite of your homemade sweet potato cheesecake!
Can I Use Canned Sweet Potatoes Instead of Fresh?
Yes! Canned sweet potatoes can be a convenient substitute. Just make sure to drain them well and mash them before using to avoid excess moisture in your cheesecake filling.
How Long Can I Store Leftovers?
Leftover sweet potato cheesecake can be stored in an airtight container in the refrigerator for up to 5 days. For longer storage, you can freeze individual slices for up to 2 months. Just wrap each slice tightly in plastic wrap and then foil before freezing!
What Can I Use Instead of Sour Cream?
If you don’t have sour cream on hand, Greek yogurt makes a great substitute! It adds a similar creaminess and tang without compromising the flavor of your cheesecake.
Can I Make This Cheesecake Gluten-Free?
Absolutely! Use gluten-free graham cracker crumbs or ground nuts (like almond flour) mixed with a bit of melted butter to create a gluten-free crust. Just ensure all other products are certified gluten-free as well.