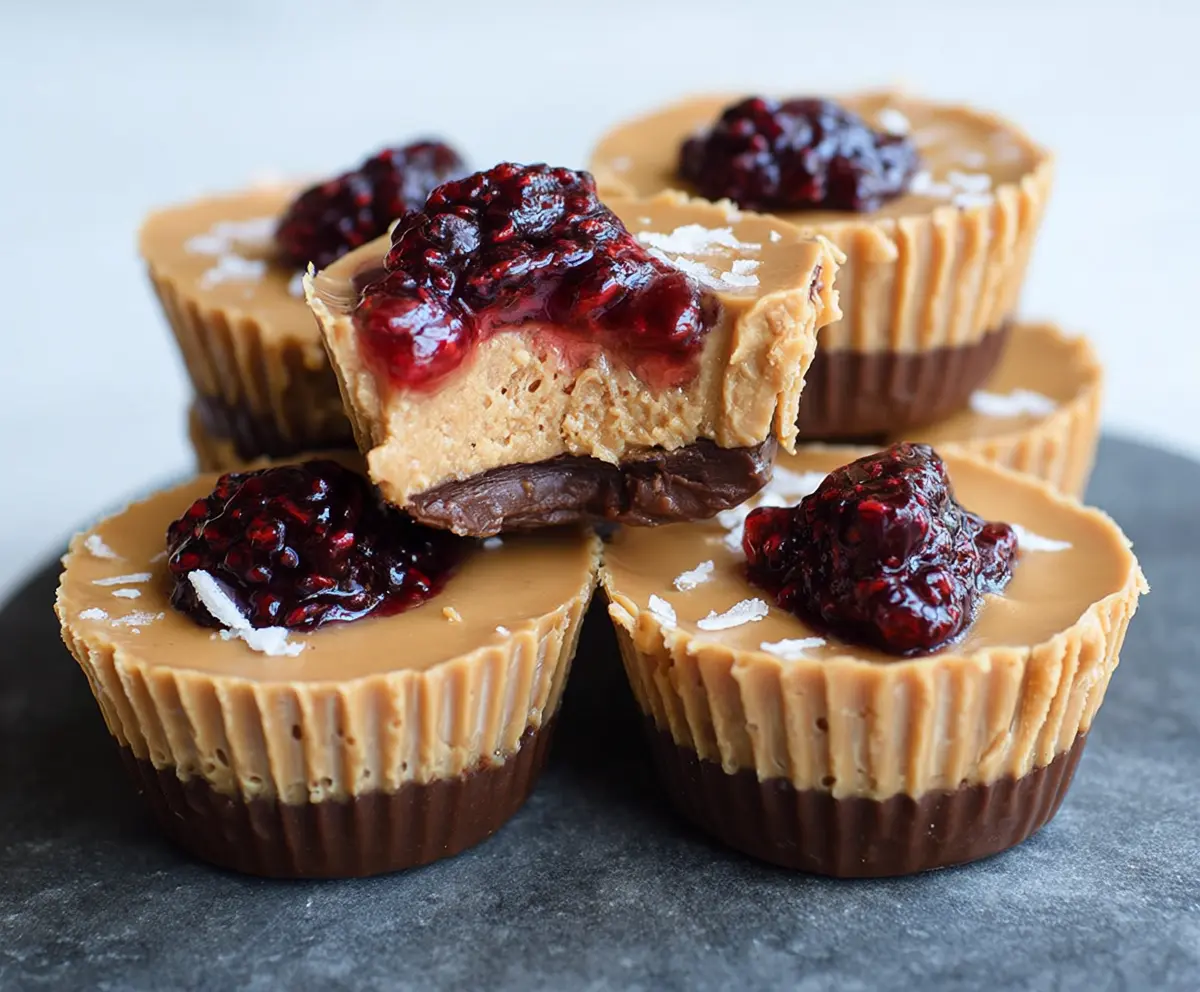
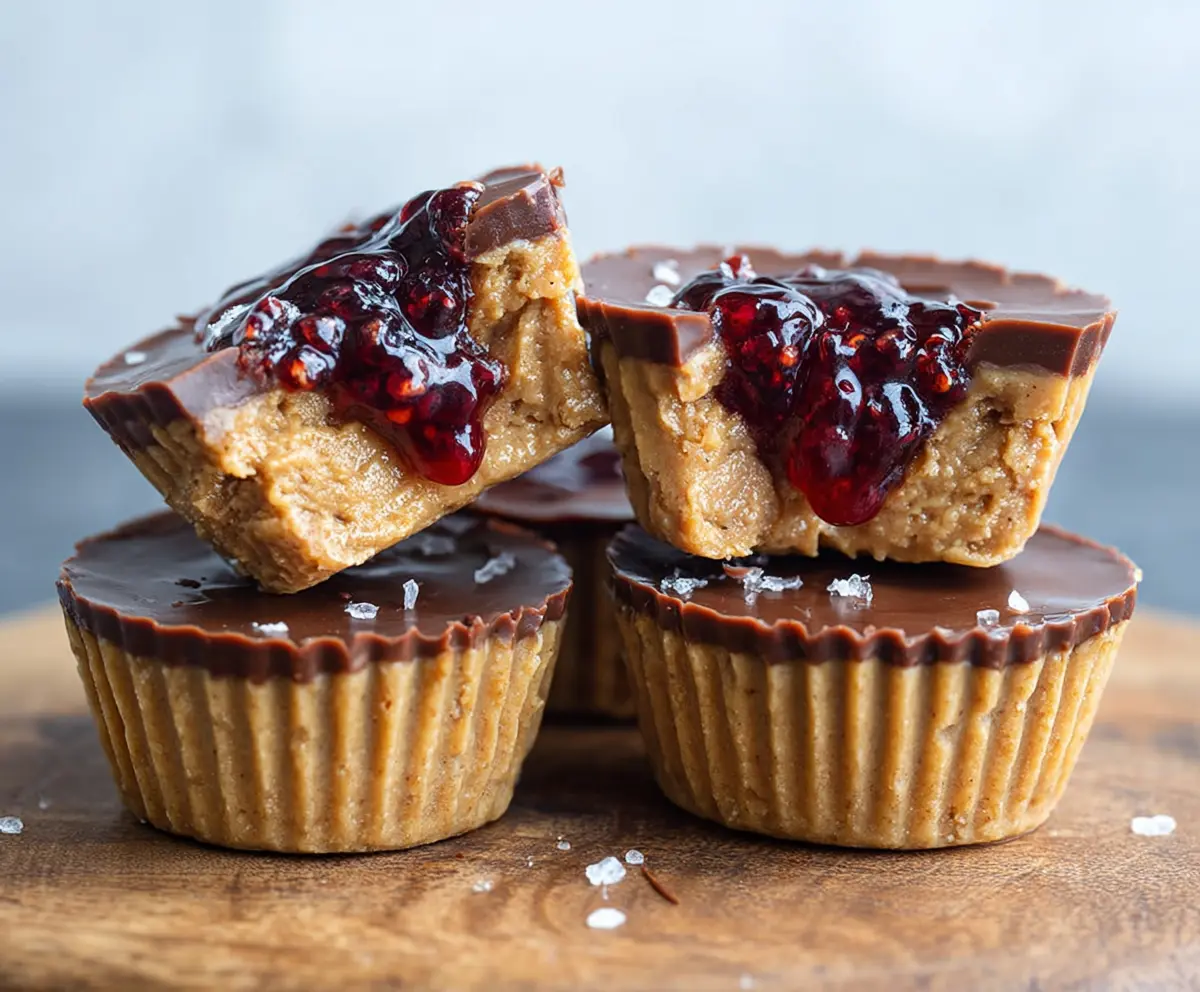
These Healthy Peanut Butter and Jelly Cups are a fun twist on the classic combo! They have a creamy peanut butter filling and a sweet fruit layer, all wrapped in a crunchy shell.
Perfect for a quick snack or dessert, they really hit the spot when you’re craving something tasty yet good for you. Plus, they’re super easy to make—just mix, layer, and enjoy!
Key Ingredients & Substitutions
Dark Chocolate Chips: I recommend using high-quality dark chocolate chips for the rich flavor. If you’re dairy-free, opt for vegan chocolate chips. You can also use milk chocolate chips if preferred, but keep in mind it will be sweeter.
Natural Peanut Butter: Choose unsweetened natural peanut butter for a healthy option. If you need it to be nut-free, sunflower seed butter works great too. Crunchy or smooth? It’s all about your texture preference!
Coconut Oil: This adds creaminess and helps the cups hold their shape. You can substitute it with butter or a plant-based margarine if you want, but coconut oil gives a unique flavor.
Maple Syrup or Honey: These are optional, depending on how sweet you want your cups. If you’re avoiding sugar, try using a sugar-free sweetener like stevia or monk fruit, but adjust to taste.
Berry Jam or Jelly: A low-sugar or homemade jam keeps things healthier. You can also use any fruit spread you like, such as apricot or peach, for a different flavor twist!
How Do You Melt Chocolate Without Burning It?
Melted chocolate can be tricky since it burns easily. Here’s a simple way to do it in the microwave:
- Place your chocolate chips in a microwave-safe bowl. Add 1-2 tablespoons of coconut oil to help it melt smoothly.
- Microwave the chocolate in short bursts of 20 seconds, stirring in between. This allows you to monitor it closely.
- Keep going until it’s almost fully melted, then give it a good stir. The remaining heat will finish melting the chocolate without burning.
This technique helps to keep your chocolate silky and smooth for your cups!
How to Make Healthy Peanut Butter And Jelly Cups
Ingredients You’ll Need:
For the Cups:
- 1 cup dark chocolate chips (or vegan/dairy-free if preferred)
- 1/2 cup natural peanut butter (smooth or crunchy, unsweetened)
- 1/4 cup coconut oil, melted
- 2 tablespoons maple syrup or honey (optional, for sweetness)
- 1/2 teaspoon vanilla extract
- 1/2 cup seedless berry jam or jelly (preferably low sugar or homemade)
- Pinch of flaky sea salt (optional, for garnish)
How Much Time Will You Need?
This recipe takes about 15 minutes of active preparation time, plus an additional 40 minutes to chill in the freezer. You’ll need about 10 minutes to melt and layer the chocolate and peanut butter, and then just let the cups set up in the freezer. Super simple!
Step-by-Step Instructions:
1. Prepare Your Molds:
First things first! Line a mini muffin tin with paper liners or use silicone molds to prevent sticking. This will make it easy to remove your cups later.
2. Melt the Chocolate:
In a microwave-safe bowl, combine the dark chocolate chips and 1-2 tablespoons of melted coconut oil. Microwave them in short bursts of 20 seconds, stirring in between, until the mixture is completely smooth. Be careful not to burn the chocolate!
3. Create the Chocolate Base:
Once melted, spoon a small amount of the chocolate into the bottom of each muffin cup—just enough to cover the base. After adding the chocolate, place the tray in the freezer for about 5-10 minutes to let it set hard.
4. Make the Peanut Butter Mixture:
While the chocolate sets, grab a mixing bowl. Combine the natural peanut butter, remaining melted coconut oil, maple syrup (if you want to add sweetness), and vanilla extract. Stir everything together until it’s nice and creamy.
5. Layer the Peanut Butter Filling:
When the chocolate base is firm, take the muffin tin out of the freezer. Spoon the peanut butter mixture evenly over the chocolate layer, smoothing it as best as you can for a nice finish.
6. Add the Jelly Top:
Now, it’s time for the fun part! Add a small dollop of your berry jam or jelly on top of each peanut butter layer. This adds a sweet and fruity touch that balances out the creaminess.
7. Optional Salt Garnish:
If you like a little savory touch, sprinkle a tiny pinch of flaky sea salt over the jam layer. It really enhances the flavors!
8. Freeze Until Firm:
Place the cups back in the freezer and let them set for about 30 minutes. They should be nice and firm by the time you’re ready to enjoy them.
9. Enjoy & Store:
Once fully set, carefully remove the cups from the molds. Store them in an airtight container in the refrigerator or freezer. Enjoy these delicious cups any time you crave a healthy snack or dessert!
These Healthy Peanut Butter And Jelly Cups are perfectly balanced with rich chocolate, creamy peanut butter, and fruity jelly—just like a classic PB&J sandwich, but in a delightful bite-sized form!
Can I Use Another Nut Butter Instead of Peanut Butter?
Absolutely! You can substitute peanut butter with almond butter, cashew butter, or even sunflower seed butter for a nut-free option. Just make sure to choose a natural variety without added sugars or oils for the healthiest choice.
How Long Can I Store These Cups?
These Healthy Peanut Butter And Jelly Cups can be stored in an airtight container in the refrigerator for up to a week. If you’d like them to last longer, they can also be kept in the freezer for up to 3 months—just thaw them in the fridge before enjoying!
Can I Make These Cups Vegan?
Yes, you can easily make these cups vegan by using dairy-free dark chocolate chips and maple syrup instead of honey. Just check the labels to ensure all ingredients are vegan-friendly!
What If I Don’t Have Mini Muffin Tins?
No worries! You can use regular muffin tins, just be aware that the cups will be larger. Alternatively, silicone molds in different shapes can add a fun twist to your cups!